12 Of The Best Simple Steps to Perfect Pastry Baking
Perfect Pastry Baking; Do you want to master the art of pastry baking? Look no further! In “12 Simple Steps to Perfect Pastry Baking,” we will guide you through the process, step by step, ensuring that your pastries turn out flawless every time. From gathering your ingredients to adding liquids gradually, we will teach you the tricks of the trade. Keep your butter cold and use a food processor or pastry cutter for optimal results. Say goodbye to soggy bottoms by blind baking your crust for a crisp finish. And for that beautiful golden touch, brush your pastry with egg wash. So, put on your apron and get ready to impress with your perfect pastries!
Gather Your Ingredients
You should gather all your ingredients before starting to bake perfect pastry. The importance of ingredient quality cannot be overstated when it comes to achieving the best results in your baking endeavors. Take the time to ensure that you are using fresh and high-quality ingredients to guarantee the tastiest and most tender pastry.
When it comes to pastry, proper mixing techniques are key to achieving the desired texture and consistency. Begin by sifting your dry ingredients together to remove any lumps and ensure even distribution. This step is especially important when working with flour, as it helps to aerate the mixture and create a lighter pastry.
Next, incorporate cold butter into the dry ingredients using a pastry cutter or your fingertips. The goal is to achieve a crumbly texture, with small pea-sized pieces of butter evenly distributed throughout the mixture. This is crucial for creating a flaky and tender pastry.
Once the butter is properly incorporated, add cold water gradually, one tablespoon at a time, while gently mixing the dough with a fork or your hands. Be careful not to overmix, as this can lead to a tough pastry. The dough should come together and hold its shape when lightly pressed.
Measure Accurately
To ensure the best results in your pastry baking, accurately measuring your ingredients is essential. Precise measurements not only guarantee consistent outcomes but also ensure that the delicate balance of flavors and textures in your pastries is maintained. Here are three measuring techniques to help you achieve perfection in your baking:
- Use a kitchen scale: While measuring cups and spoons are commonly used in baking, they can be imprecise. A kitchen scale allows you to measure ingredients by weight, providing accuracy and consistency. This is particularly important when it comes to measuring flour, as its density can vary depending on factors like humidity and how it is packed.
- Level off dry ingredients: When measuring dry ingredients like flour, sugar, or cocoa powder, it’s important to level off the measuring cup or spoon. Using the back of a butter knife or a straight edge, scrape off any excess ingredient to ensure you have the exact amount required. This simple step can make a significant difference in the final outcome of your pastries.
- Spoon and level liquid ingredients: When measuring liquids such as milk, water, or oil, use a liquid measuring cup with a spout. Fill the cup to the desired amount, then check the measurement at eye level. This ensures accurate measurements, as the liquid can form a slight curve at the surface due to surface tension.
Keep Your Butter Cold
To achieve perfect pastry baking, it is crucial to keep your butter cold. Cold butter is essential because it creates steam when it melts in the oven, leading to flakier and more tender pastries. Remember to use butter straight from the fridge and avoid letting it sit at room temperature, as warm butter will result in dense and greasy pastries.
Importance of Cold Butter
Start by using a generous amount of cold butter when making pastry dough. Keeping your butter cold is essential for achieving perfect pastry. Here’s why:
- Flakiness: Cold butter creates pockets of steam when it melts during baking, resulting in a light and flaky texture that melts in your mouth. Using room temperature butter will cause the dough to become greasy, resulting in a dense and heavy pastry.
- Easy blending: Cold butter is easier to incorporate into the flour mixture. Its solid state allows it to be cut into the dry ingredients, creating a crumbly texture that is perfect for pie crusts and pastries.
- Longer shelf life: By using cold butter, your pastry dough will stay fresher for longer. The low temperature slows down the growth of bacteria, ensuring that your baked goods stay delicious and safe to eat.
Tips for Butter Temperature
Now that you understand the importance of keeping your butter cold in pastry baking, let’s discuss some tips for maintaining the right butter temperature. Butter temperature control is crucial for achieving flaky crusts. To keep your butter cold, start by cutting it into small cubes and placing them in the refrigerator for about 15 minutes before using.
Using cold butter helps create layers in the pastry dough, resulting in a light and delicate texture. Additionally, work quickly when incorporating the butter into the dough to minimize heat transfer from your hands. If the butter starts to soften too much, return the dough to the refrigerator for a few minutes to chill. Remember, the colder the butter, the better chance you have of achieving perfectly flaky pastry crusts.
Effects of Warm Butter
Maintaining the right temperature of your butter is essential for achieving flaky pastry crusts. Using warm butter can have negative effects on your pastry, resulting in a less desirable texture and appearance. Here are three troubleshooting tips to avoid the effects of warm butter:
- Tough Texture: When warm butter is used, it melts too quickly in the dough, causing the gluten to develop excessively. This leads to a tough and chewy pastry crust.
- Poor Layering: Cold butter creates steam when it evaporates in the oven, creating pockets that result in a flaky texture. Warm butter, on the other hand, melts before it evaporates, leading to a denser and less layered pastry.
- Spreading and Shrinkage: Warm butter causes the pastry to spread during baking, resulting in a thinner and less defined shape. It can also cause shrinkage as the butter melts away, leaving gaps in the crust.
To avoid these issues, always use cold butter and handle it as little as possible to keep it from warming up.
Use a Food Processor or Pastry Cutter
To achieve perfectly blended pastry dough, begin by using a food processor or pastry cutter. Both tools offer distinct benefits that can help you achieve the desired texture and consistency for your pastries.
A food processor is a versatile kitchen appliance that can make the process of blending pastry dough quick and effortless. Its powerful motor and sharp blades ensure that your ingredients are evenly mixed and incorporated. Simply add your dry ingredients to the food processor bowl, pulse a few times to combine, and then add in your cold butter. The food processor will cut the butter into the dry ingredients, creating a crumbly texture that is essential for a flaky pastry. This method not only saves time and effort compared to manually cutting the butter, but it also helps to prevent the butter from melting too much, which can result in a tougher dough.
On the other hand, a pastry cutter is a handheld tool specifically designed for cutting butter into flour. This technique involves using a rocking motion with the pastry cutter to break up the butter into small pieces while blending it with the flour. By using a pastry cutter, you have more control over the blending process and can easily adjust the size of the butter pieces to achieve the desired flakiness in your pastry. It requires a bit more manual effort compared to using a food processor, but it allows you to have a hands-on approach and a better feel for the dough.
Add Liquids Gradually
Next, add your liquids gradually to the pastry dough while mixing it together. This step is crucial to ensure that your pastry turns out light, flaky, and perfectly textured. Here are some tips for adding liquids to your pastry dough and avoiding common mistakes:
- Measure your liquids accurately: When adding liquids to your pastry dough, it is essential to measure them accurately. Use measuring cups or a kitchen scale to ensure that you are adding the right amount. Adding too much liquid can make the dough sticky and difficult to work with, while too little can result in a dry and crumbly texture.
- Pour slowly and mix gently: To incorporate the liquids into the dough, pour them in slowly while simultaneously mixing the dough. This gradual addition allows the dough to absorb the liquid evenly, resulting in a consistent texture. Be careful not to overmix the dough, as it can lead to a tough and chewy pastry.
- Adjust as needed: As you add the liquids, pay attention to the consistency of the dough. If it feels too dry, add a small amount of liquid at a time until the dough comes together. Conversely, if the dough becomes too wet, sprinkle a little flour and gently knead it in until the desired texture is achieved.
Don’t Overmix the Dough
When mixing your pastry dough, be careful not to overmix it. Overmixing can have negative effects on the texture and taste of your pastries. When the dough is overmixed, the gluten in the flour develops too much, resulting in a tough and chewy texture. The pastries may also become dense and heavy instead of light and flaky. To prevent this from happening, there are a few techniques you can use.
First, it’s important to mix the dough just until the ingredients are combined. Avoid excessive stirring or kneading, as this can lead to overmixing. Use a light touch and stop mixing as soon as the dough comes together. This will help to keep the gluten from developing too much.
Another technique is to use a pastry cutter or your fingertips to cut the fat into the flour. This method allows for better control and prevents overmixing. By cutting the fat into small pieces and blending it with the flour, you can create a crumbly texture that will result in a flaky pastry.
Additionally, chilling the dough before baking can help prevent overmixing. When the dough is cold, the fat is firmer and less likely to melt during mixing. This helps to maintain the desired texture and prevents the dough from becoming overmixed.
Chill the Dough Before Rolling
Before rolling out the dough, make sure to chill it in the refrigerator. Chilling the dough has several benefits that can greatly improve the quality of your pastry baking. Here are three reasons why chilling the dough is essential:
- Enhanced Texture: Chilling the dough allows the fat in the pastry to solidify. This is especially important for recipes that require butter or shortening. When the fat is cold, it remains separate from the flour, creating layers and resulting in a flaky and tender texture. Without chilling, the fat can melt too quickly during baking, resulting in a dense and greasy pastry.
- Improved Handling: Cold dough is easier to work with. It is less sticky and more manageable, making it easier to roll out without sticking to the rolling pin or countertop. Chilled dough also holds its shape better, allowing you to create more precise and uniform pastries.
- Prevents Shrinkage: Chilling the dough before baking helps to prevent shrinkage. When the dough is exposed to high heat, the fat melts and creates steam. If the dough has not been properly chilled, the steam is released too quickly and causes the pastry to shrink. By chilling the dough, the fat remains solid for longer, allowing the layers to set properly and preventing excessive shrinkage.
While chilling the dough is crucial, it is important to avoid common mistakes that can affect the final result. One mistake is not chilling the dough for long enough. Ideally, the dough should be chilled for at least 30 minutes, but some recipes may require longer chilling times. Another mistake is over-chilling the dough, which can make it too hard and difficult to roll out. Lastly, make sure to wrap the dough tightly in plastic wrap or a zip-top bag to prevent it from drying out in the refrigerator.
Roll Out the Dough Evenly
To ensure a smooth and uniform pastry, roll out the chilled dough evenly. Achieving an even thickness is crucial for a successful bake, as it promotes even cooking and prevents any areas from being undercooked or overcooked. Here are some rolling techniques to help you achieve the perfect evenness in your pastry.
First, start by dusting your work surface and rolling pin with flour. This will prevent the dough from sticking and make it easier to roll out. Place the chilled dough on the floured surface and begin rolling from the center outwards. Applying even pressure, roll the pin back and forth, rotating the dough occasionally to maintain an even thickness.
If you find that the dough is sticking to the rolling pin or surface, lightly dust it with more flour. This will prevent any tearing or stretching of the dough, which can result in an uneven thickness. Remember to use gentle and smooth motions to maintain the shape and integrity of the dough.
Checking the thickness periodically is essential to ensure evenness. Use a ruler or pastry mat with measurements to check that the dough is rolled out to the desired thickness. If needed, adjust the pressure or rolling technique to achieve the desired evenness.
Once you have achieved an even thickness, you can proceed with using the dough for your pastry recipe. Remember that rolling out the dough evenly is just one step in creating a perfect pastry. Following the other steps, such as chilling the dough, using quality ingredients, and practicing proper baking techniques, will further enhance your baking results.
Use Parchment Paper or a Silicone Baking Mat
When it comes to baking pastries, using parchment paper or a silicone baking mat can greatly enhance your results. Parchment paper provides a non-stick surface that ensures easy removal of your baked goods without any sticking or tearing. On the other hand, a silicone baking mat offers the benefits of reusable, heat-resistant material that evenly distributes heat for consistent baking. Whichever option you choose, both parchment paper and silicone baking mats are essential tools that will help you achieve perfect pastry baking results every time.
Benefits of Parchment Paper
While baking pastries, it is important to consider the benefits of using parchment paper or a silicone baking mat. Here are three reasons why parchment paper is a great choice for your baking needs:
- Easy Cleanup: Parchment paper creates a non-stick surface, preventing your pastries from sticking to the baking sheet. This means less scrubbing and scraping after baking, saving you time and effort.
- Even Baking: Parchment paper helps distribute heat evenly, resulting in perfectly baked pastries with golden, crispy crusts. It acts as a barrier between the dough and the baking sheet, preventing the bottoms from over-browning.
- Versatility: Beyond baking, parchment paper has a range of alternative uses. It can be used as a wrapper for homemade candies or as a convenient surface for rolling out dough. It can even be used to create parchment paper packets for cooking fish or vegetables, locking in flavors and moisture.
Incorporating parchment paper into your pastry baking routine can greatly enhance your baking experience, making it easier, more efficient, and yielding delicious results.
Silicone Mat Vs. Parchment
For the best results in your pastry baking, consider using either parchment paper or a silicone baking mat. While both options have their advantages, it ultimately depends on your personal preference and baking needs. If you’re looking for a silicone mat alternative, parchment paper is a great option. It provides a non-stick surface that prevents your pastries from sticking to the baking sheet. Parchment paper also helps with even heat distribution, ensuring that your pastries bake evenly.
Additionally, parchment paper is versatile and can be used for a variety of baking purposes. It is also disposable, making clean-up a breeze. On the other hand, silicone baking mats are reusable and eco-friendly. They offer excellent heat resistance and can withstand high temperatures without warping or melting. Silicone mats are also great for creating a non-stick surface, but they require a bit of extra care during cleaning and storage. Ultimately, whether you choose parchment paper or a silicone mat, both options will help you achieve perfect pastry baking results.
Best Practices for Baking
To ensure optimal baking results, incorporate the use of either parchment paper or a silicone baking mat into your baking routine. These tools not only prevent your baked goods from sticking to the pan but also provide a non-stick surface for even browning and easy release. Here are three reasons why using parchment paper or a silicone baking mat is a best practice for baking:
- Even Heat Distribution: Parchment paper and silicone baking mats create a barrier between your baked goods and the pan, which helps distribute heat evenly. This ensures that your pastries bake uniformly and avoids any burnt edges or undercooked centers.
- Easy Cleanup: Baking can be messy, but using parchment paper or a silicone baking mat makes cleanup a breeze. Simply remove the paper or mat with your baked goods, and you’re left with a clean pan that requires minimal scrubbing.
- Versatility: Parchment paper and silicone baking mats can be used for various baking techniques, from cookies to pastries to roasted vegetables. They are also great troubleshooting tools, as they prevent overbrowning or sticking, giving you more control over your baking results.
Incorporating parchment paper or a silicone baking mat into your baking routine is a simple yet effective way to improve your baking outcomes. With these best practices, you can enjoy perfectly baked treats every time.
Blind Bake for a Crisp Crust
To achieve a crisp crust, start by blind baking your pastry using an article determiner. Blind baking is a technique used to partially or fully bake a pastry crust before adding the filling. This helps to ensure that the crust remains crisp, even when filled with moist ingredients. To blind bake your pastry, begin by preheating the oven to the specified temperature in your recipe.
First, roll out your pastry dough and fit it into your pie dish or tart pan. Next, line the pastry with parchment paper or aluminum foil, making sure to press it against the edges and sides. This will help to prevent the crust from shrinking during baking. Fill the lined pastry with pie weights or dry beans, distributing them evenly across the surface. The weights will help to keep the pastry flat and prevent it from puffing up.
Place the dish in the preheated oven and bake for the specified time in your recipe. This initial baking time will depend on the type of pastry and the recipe you are using. After the specified time, carefully remove the parchment paper or foil with the weights. If the crust appears pale or undercooked, you can return it to the oven for a few more minutes to achieve a golden brown color.
Troubleshooting common blind bake issues involves paying attention to the details. If your crust becomes soggy after blind baking, ensure that you have lined the pastry with parchment paper or foil and pressed it against the edges and sides. Additionally, make sure that the weights are evenly distributed across the surface to prevent any areas from becoming undercooked. If your crust shrinks during blind baking, try chilling the pastry in the refrigerator for 30 minutes before blind baking. This will help to relax the gluten and minimize shrinkage.
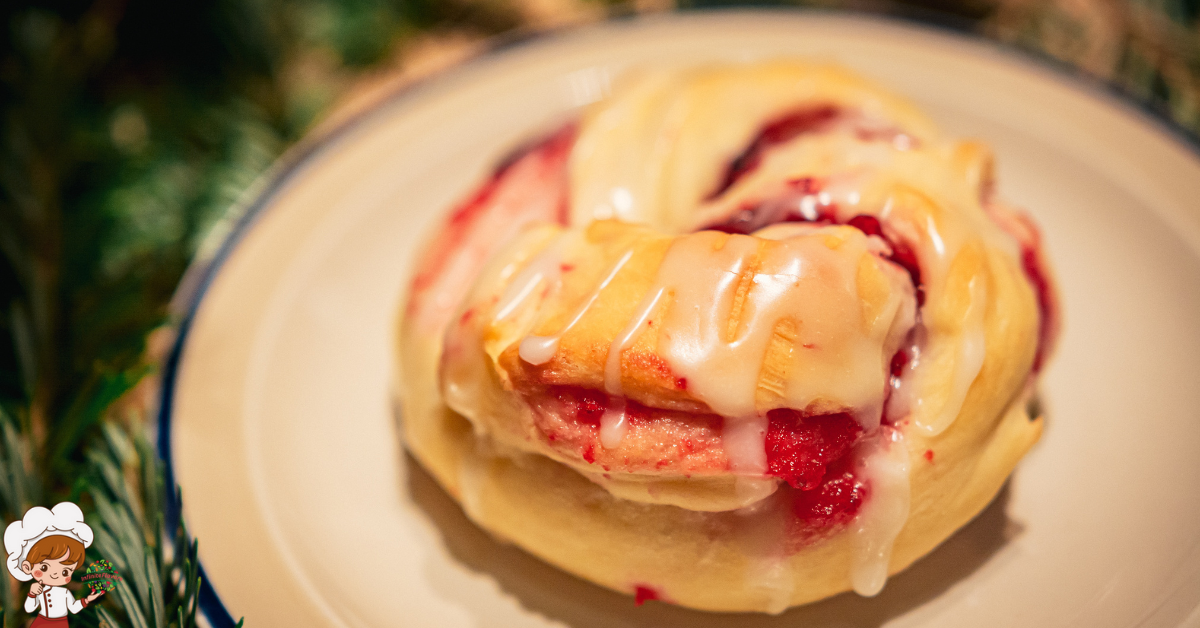
Brush With Egg Wash for a Golden Finish
To achieve a golden finish on your pastries, brushing them with egg wash is essential. Egg wash not only adds a beautiful shine, but it also helps to create a crispy and golden crust. If you don’t have eggs on hand, you can use alternative ingredients such as milk or cream for a similar effect. To ensure an even coating, use a pastry brush to gently apply the wash onto the pastry surface, making sure to cover every inch for a professional-looking result.
Benefits of Egg Wash
Achieve a golden finish on your pastries by brushing them with egg wash, a mixture made with beaten eggs and a compound preposition. Egg wash not only adds a beautiful golden color to your baked goods, but it also enhances their flavor and texture. Here are three benefits of using egg wash:
- Crisp and glossy appearance: When you brush your pastries with egg wash, it creates a shiny and attractive finish that makes them look more appealing. This is especially important for pastries like pies, tarts, and bread rolls.
- Sealing and gluing: Egg wash acts as a natural adhesive, helping to seal and glue the edges of your pastries together. This is particularly useful when making turnovers, empanadas, or any folded pastry where a tight seal is required.
- Adds richness and flavor: The proteins and fats in the egg wash contribute to the overall richness and flavor of your pastries. It gives them a buttery taste and a slightly savory note that complements the sweetness of many desserts.
While egg wash is a popular choice, you can also use alternative ingredients like milk, cream, or even melted butter to achieve similar results. However, keep in mind that these alternatives may yield slightly different textures and flavors.
Alternative Ingredients for Wash
Brushing your pastries with alternative ingredients can also result in a golden finish, offering a delicious and visually appealing touch to your baked goods. If you’re looking for substitutes for egg wash, there are several options that can give you a similar effect. One popular alternative is milk, which can be used as a simple brush-on wash. It will give your pastries a nice shine and a subtle golden color.
Another option is melted butter, which not only adds flavor but also helps in achieving a beautiful golden crust. For a vegan-friendly option, you can use a mixture of non-dairy milk, such as almond or soy milk, with a touch of maple syrup. This will give your pastries a lovely golden hue and a hint of sweetness. Experiment with different alternative wash ingredients to find the one that suits your taste and dietary preferences.
Techniques for Even Coating
You can achieve a perfect golden finish on your pastries by brushing them with an egg wash. The technique of brushing with an egg wash ensures an even coating on the surface of your baked goods, giving them a beautiful and professional appearance. Here are three reasons why this technique is essential for achieving a smooth finish:
- Enhanced Appearance: Brushing your pastries with an egg wash creates a glossy and golden sheen, making them visually appealing and enticing.
- Improved Texture: The egg wash helps to seal the pastry, creating a crisp and flaky outer layer while keeping the inside moist and tender.
- Flavor Boost: The egg wash adds a subtle richness to the pastry, enhancing its overall taste and making it more enjoyable.
Let the Pastry Cool Before Filling or Decorating
To ensure optimal results, allow the pastry to cool completely before filling or decorating. Cooling the pastry is an essential step in the baking process as it helps to set the structure and texture of the pastry. Here are some tips for cooling pastry and creative decorating ideas to make your pastries even more enticing.
After removing the pastry from the oven, place it on a wire rack to cool. This allows air to circulate around the pastry, preventing condensation and ensuring even cooling. Avoid placing the hot pastry on a flat surface as it can trap heat and make the bottom soggy.
For quicker cooling, you can transfer the pastry to the refrigerator. This is especially useful if you are short on time or if you live in a warm climate. Simply place the pastry on a baking sheet and let it cool for about 30 minutes in the refrigerator. Once cooled, you can proceed with filling or decorating.
When it comes to decorating, the possibilities are endless. You can use a variety of techniques and ingredients to add visual appeal to your pastries. One creative idea is to use a stencil to create intricate patterns on the top of the pastry. Place the stencil over the pastry and dust with powdered sugar or cocoa powder. Carefully lift the stencil to reveal a beautiful design.
Another idea is to use colored icing or glaze to add a pop of color to your pastries. You can drizzle the icing over the top or create intricate designs using a piping bag. Sprinkles, edible flowers, and fresh fruit are also great options for adding a touch of creativity to your pastries.

Perfect Pastry Baking; Frequently Asked Questions
Can I Use Margarine Instead of Butter in Pastry Baking?
You can use margarine instead of butter in pastry baking, but keep in mind that butter provides a richer flavor and flakier texture. For a perfect pastry crust, use cold butter and handle the dough gently.
How Do I Prevent My Pastry Dough From Sticking to the Rolling Pin?
To prevent your pastry dough from sticking to the rolling pin, you can lightly flour the rolling pin and the surface of the dough. Alternatively, you can use a silicone rolling pin or a non-stick rolling pin cover for easy rolling.
Can I Substitute a Gluten-Free Flour for All-Purpose Flour in Pastry Recipes?
Yes, you can substitute a gluten-free flour for all-purpose flour in pastry recipes. Just make sure to use a gluten-free flour blend that is specifically designed for baking. Also, consider using alternative fats like coconut oil or dairy-free margarine for your pastry baking.
How Do I Avoid a Soggy Bottom Crust When Blind Baking?
To avoid a soggy bottom crust when blind baking, start by preheating your oven and chilling your pastry. Then, line it with parchment paper, fill it with pie weights, and bake until the crust is golden brown.
What Is the Best Way to Store Leftover Pastry Dough for Later Use?
To store leftover pastry dough for later use, you can wrap it tightly in plastic wrap or place it in an airtight container. This will help preserve its freshness and prevent it from drying out.
Conclusion
In conclusion, by following these 12 simple steps, you can achieve perfect pastry baking every time. Start by gathering your ingredients and measuring them accurately. Remember to keep your butter cold and use a food processor or pastry cutter to achieve the perfect texture. Add liquids gradually and use parchment paper or a silicone baking mat for easy cleanup. Blind bake for a crisp crust and brush with egg wash for a golden finish. Finally, let the pastry cool before filling or decorating. Happy baking!