13 Tips for Baking The Best Traditional Bread
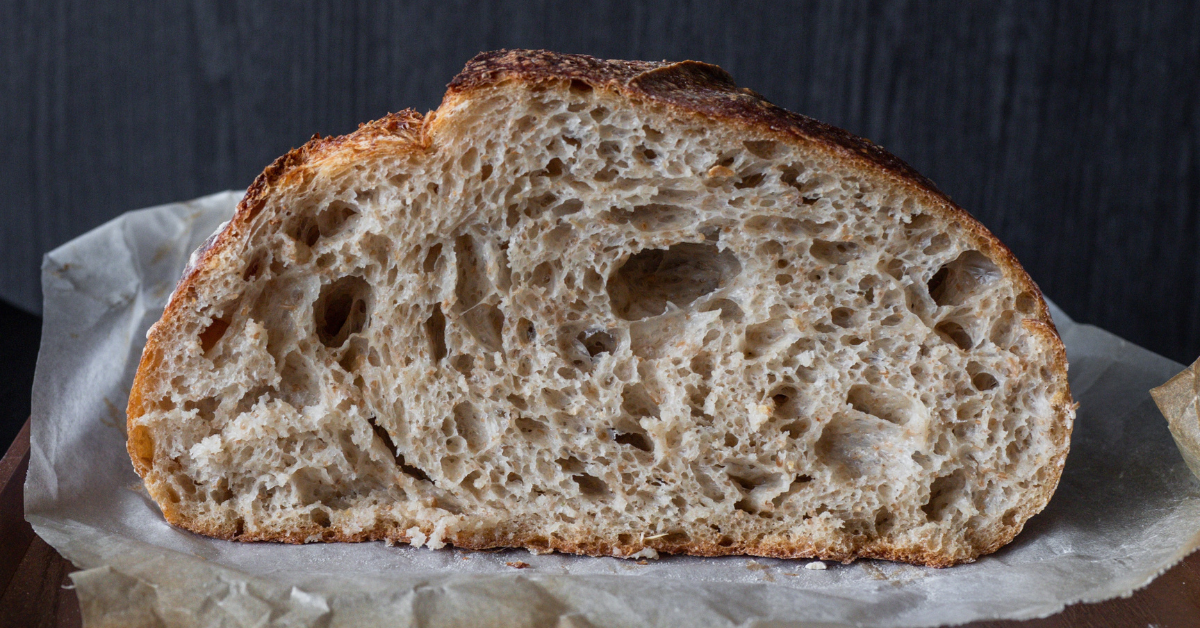
Want to become a pro at baking Traditional Bread? Look no further! We’ve got thirteen tips that will help you achieve bread-baking success. From choosing the right flour to troubleshooting common issues, we’ve got you covered. Mastering the art of kneading and understanding dough hydration are essential skills that will take your bread to the next level. And let’s not forget about fermentation, the secret ingredient for flavorful bread. Proper proofing and achieving the perfect crust are also key steps in the process. So, get ready to roll up your sleeves and dive into the wonderful world of bread baking. With these tips, you’ll be baking like a pro in no time!
Bake with Style—Click Here For Our Collection and Start Creating
Choosing the Right Flour
Are you unsure about which flour to use when baking traditional bread? Choosing the right flour is crucial to achieving the perfect texture, flavor, and rise in your homemade loaves. Let’s explore the different types and characteristics of flour, as well as some flour substitutions and alternatives.
When it comes to traditional bread baking, all-purpose flour is a popular choice. It has a moderate protein content, around 10-12%, which gives bread a good rise and a tender crumb. Bread flour, on the other hand, has a higher protein content, typically around 12-14%. This higher protein content creates more gluten, resulting in a chewier and more structured bread. If you prefer a lighter loaf, consider using cake flour, which has a lower protein content of around 6-8%.
If you’re looking for gluten-free options, there are several alternatives to wheat flour. Almond flour, made from ground almonds, adds a nutty flavor and a moist texture to bread. Coconut flour, derived from dried coconut meat, is high in fiber and low in carbohydrates. It absorbs moisture easily, so be sure to adjust your recipe accordingly. Another gluten-free option is rice flour, which comes in both white and brown varieties. It has a mild flavor and a fine texture, ideal for achieving a light and airy bread.
When it comes to flour substitutions, there are a few options. If you don’t have bread flour on hand, you can mix all-purpose flour with vital wheat gluten to increase the protein content. Additionally, if you’re out of all-purpose flour, you can substitute it with a combination of cake flour and bread flour.
Choosing the right flour for your traditional bread is essential to achieving the desired results. Consider the types and characteristics of flour, as well as flour substitutions and alternatives, to create the perfect loaf every time. Happy baking!
Bake with Style—Click Here For Our Collection and Start Creating
Mastering the Art of Kneading
To master the art of kneading traditional bread successfully, start by understanding the importance of proper technique. When it comes to baking bread, the way you knead the dough can make all the difference in the final product. Here are some tips to help you master the art of kneading:
- Develop a rhythm: Kneading is not just about applying force to the dough; it’s about finding a rhythm that works for you. Use the heel of your hand to push the dough away from you, then fold it back towards you with your fingertips. Repeat this motion, gradually increasing the speed and intensity.
- Watch the consistency: Pay attention to the consistency of the dough as you knead. It should be smooth and elastic, but not too sticky. If it feels too dry, add a little more water; if it’s too sticky, sprinkle in some flour. Adjusting the consistency will ensure a better texture in the final bread.
- Use your senses: Kneading is not just a physical activity; it also requires you to use your senses. Feel the texture of the dough as you work it, listen for the sound of air bubbles popping, and observe how the dough changes in color and elasticity.
- Embrace hand kneading: While there are machines that can knead the dough for you, there are benefits to hand kneading. It allows you to have better control over the process and feel the changes in the dough more intuitively. Hand kneading also gives you a better understanding of the dough’s development and helps you connect with the ancient tradition of breadmaking.
Understanding Dough Hydration
Understanding dough hydration is crucial in baking traditional bread successfully. The water-to-flour ratio directly impacts the texture, rise, and overall consistency of your dough. By adjusting the hydration, you can achieve the desired results, whether it’s a soft and moist crumb or a crusty exterior.
Bake with Style—Click Here For Our Collection and Start Creating
Water-To-Flour Ratio Importance
To ensure successful traditional bread baking, it is crucial that you understand the importance of the water-to-flour ratio, as it directly affects the hydration of the dough. The right amount of water is essential for achieving the desired texture and structure in your bread. Here are four key points to help you grasp the significance of the water-to-flour ratio:
- Importance of hydration levels: The water content determines how hydrated the dough becomes during the fermentation process. Proper hydration allows the dough to develop gluten, leading to a light and airy texture.
- Effects of water content on bread texture: Too much water can make the dough too wet and difficult to handle, resulting in a dense and gummy texture. On the other hand, insufficient water can lead to a dry and crumbly texture.
- Achieving the right balance: Finding the optimal water-to-flour ratio is crucial for achieving the desired bread texture. It’s a delicate balance that requires practice and experimentation.
- Adjusting hydration levels: Depending on the type of bread you’re baking, you may need to adjust the water-to-flour ratio. Recipes for different breads often specify the ideal hydration range to help you achieve the desired outcome.
Understanding the water-to-flour ratio and its impact on dough hydration is key to baking traditional bread successfully. It allows you to fine-tune your recipes and create bread with the perfect texture and structure.
Adjusting Hydration for Consistency
Adjusting the hydration of your dough is crucial for achieving consistent results in traditional bread baking. Hydration refers to the ratio of water to flour in your dough, and it directly affects the texture, rise, and overall quality of your bread. If your dough is too dry, your bread will be dense and lacking in flavor. On the other hand, if your dough is too wet, it will be difficult to handle and may result in a flat, gummy loaf.
To adjust the hydration, you can gradually add more water or flour to achieve the desired consistency. It’s important to note that adjusting hydration techniques may vary depending on the type of bread you are making. Troubleshooting hydration issues is common, but with practice and careful observation, you can master the art of adjusting hydration for consistently delicious bread.
Bake with Style—Click Here For Our Collection and Start Creating
Fermentation: the Secret to Flavorful Bread
To achieve flavorful bread, use a generous amount of yeast during fermentation. Fermentation is a crucial step in bread baking that allows the yeast to convert the sugars in the dough into carbon dioxide and alcohol. This process not only helps the dough rise but also develops complex flavors that make bread truly delicious. Here are four fermentation techniques for flavor development:
- Extended Fermentation: Give your dough plenty of time to ferment by using a slow-rise method. This can be achieved by refrigerating the dough overnight or allowing it to rise at room temperature for several hours. The longer fermentation time allows the flavors to develop fully.
- Sourdough Starter: Incorporate a sourdough starter into your bread recipe. This natural leavening agent adds depth and tanginess to the flavor of the bread. It takes time and patience to cultivate a sourdough starter, but the results are worth it.
- Autolyse: Before adding the yeast, let the flour and water sit together for a period of time, usually around 30 minutes. This process, known as autolyse, allows the flour to fully hydrate and the gluten to develop, resulting in improved flavor and texture.
- Pre-ferments: Use pre-ferments such as poolish or levain to enhance the flavor of your bread. These pre-ferments are made by combining a small amount of flour, water, and yeast or sourdough starter and letting it ferment for several hours or overnight. Adding pre-ferments to your dough adds complexity and depth to the final product.
The Importance of Proper Proofing
When it comes to baking traditional bread, proper proofing is essential for achieving the perfect loaf. The way you proof your dough can greatly impact the final texture and flavor of your bread. If you rush the proofing process or don’t give the dough enough time to rise, you’ll end up with a dense and underwhelming loaf. On the other hand, if you let the dough proof for too long, it might become overproofed and lose its structure. Mastering the art of proper proofing is key to baking delicious and airy bread every time.
Perfect Proofing Techniques
To achieve perfectly proofed bread, follow these essential techniques for proper proofing:
- Maintain the right proofing temperature: It is crucial to create the ideal environment for the yeast to thrive. The recommended proofing temperature is between 80°F and 85°F (27°C and 29°C). This temperature range ensures optimal yeast activity and fermentation.
- Activate the yeast properly: Before adding yeast to your dough, activate it by dissolving it in warm water with a pinch of sugar. This step ensures that the yeast is alive and ready to do its job. Wait until the mixture becomes frothy and bubbly before incorporating it into the dough.
- Allow enough time for proofing: Patience is key when it comes to proofing. Give the dough enough time to rise and double in size. This typically takes around 1 to 2 hours, depending on the recipe and proofing temperature.
- Use visual cues to determine readiness: Look for visual indicators that your dough is properly proofed. It should have a noticeably increased volume, a smooth and rounded shape, and a slight jiggle when gently shaken. These signs indicate that the yeast has done its job and the dough is ready to be baked.
Impact of Improper Proofing
Improper proofing can have a significant impact on the quality of your bread. Over proofing, which happens when the dough is left to rise for too long, can lead to a bread that is flat, dense, and lacking in flavor. The excess fermentation causes the gluten structure to weaken, resulting in a collapsed loaf.
On the other hand, under proofing occurs when the dough is not given enough time to rise fully. This can cause the bread to be dense, with a tight crumb and a lack of flavor development. Signs of under proofing include a dough that does not rise much or a loaf that feels heavy and dense after baking. It is crucial to find the right balance and give your dough enough time to rise properly to achieve the perfect loaf.
Bake with Style—Click Here For Our Collection and Start Creating
Achieving the Perfect Crust
By carefully brushing the loaf with a mixture of egg and water, you can achieve the perfect crust on your traditional bread. The crust color and texture are crucial elements that contribute to the overall taste and appearance of your loaf. Follow these tips to ensure you achieve the best crust possible:
- Use an egg wash: Brushing your loaf with an egg wash before baking creates a beautiful golden brown crust. The proteins in the egg help in achieving a glossy finish.
- Spray water: Another technique to enhance crust color is to spray water on the loaf just before placing it in the oven. This creates steam, which promotes caramelization and gives a deep, rich color to the crust.
- Baking stone or steel: Using a baking stone or steel can help achieve a crispier crust. Preheat the stone or steel in the oven and place the loaf directly on top for a more even heat distribution, resulting in a well-browned and crunchy crust.
- Steam in the oven: To achieve a crust with a chewy texture, create steam in the oven during the first few minutes of baking. This can be done by placing a pan of hot water at the bottom of the oven or spritzing water onto the sides of the oven. The steam helps keep the surface of the dough moist, allowing the crust to develop a chewy texture.
Mastering the art of achieving the perfect crust takes practice, but by following these tips, you’ll be well on your way to baking traditional bread with a crust that is both visually appealing and deliciously satisfying.
Troubleshooting Common Bread Baking Issues
If you encounter common issues while baking bread, here are some troubleshooting tips to help you overcome them. One common problem that bakers often face is related to yeast. Sometimes, the yeast fails to activate properly, resulting in bread that doesn’t rise as it should. To troubleshoot this issue, make sure that the yeast is fresh and within its expiration date.
Additionally, check the water temperature when proofing the yeast. It should be warm, but not too hot, as extreme temperatures can kill the yeast. Another common yeast problem is when the bread rises too quickly and then collapses during baking. This usually happens when the dough is overproofed. To troubleshoot this issue, make sure to follow the recommended proofing time and temperature. If your dough has already overproofed, gently deflate it and reshape it before allowing it to rise again.
Overproofed dough can also lead to a dense and heavy bread. To prevent this issue, keep an eye on the dough during the proofing process. It should rise until it is puffy and springy to the touch, but not overly inflated. If you notice that your dough has overproofed, you can try adding a small amount of instant yeast to help it rise again. However, be careful not to add too much yeast, as this can result in an overly yeasty flavor.
Bake with Style—Click Here For Our Collection and Start Creating
Traditional Bread ; Frequently Asked Questions
Can I Use All-Purpose Flour Instead of Bread Flour?
Yes, you can use all-purpose flour instead of bread flour. However, keep in mind that all-purpose flour has less protein, so you may need to adjust the recipe by adding vital wheat gluten to achieve the desired texture.
How Can I Tell if I’ve Kneaded the Dough Enough?
To know if you’ve kneaded the dough enough, pay attention to the signs of under kneading. The dough should be smooth, elastic, and spring back when pressed. Proper kneading is crucial for gluten development and achieving a light, airy texture in your bread.
What Is the Ideal Hydration Level for Bread Dough?
To achieve the ideal hydration level for bread dough, you need to find the perfect balance. Too little water will result in a dry and dense loaf, while too much can make it too sticky and difficult to handle. Avoid common hydration mistakes for better results.
How Long Should I Let the Dough Ferment for Optimal Flavor?
For optimal flavor, let the dough ferment for at least 12 to 24 hours. This extended fermentation time allows for the development of complex flavors and enhances the gluten structure, resulting in a deliciously satisfying loaf of traditional bread.
What Is the Best Way to Create a Crispy Crust on Bread?
Creating the perfect crust on bread is all about technique. To achieve a crispy crust on homemade bread, try brushing the loaf with water before baking and baking it at a high temperature.
Conclusion
In conclusion, mastering the art of traditional bread baking requires attention to detail and practice. By choosing the right flour, mastering kneading techniques, understanding dough hydration, and giving proper time for fermentation and proofing, you can achieve flavorful and perfectly crusty bread. Don’t be discouraged by common baking issues; troubleshoot and learn from them. With these thirteen tips, you’ll be on your way to successfully baking delicious traditional bread. Happy baking!


