The Best Cast Iron Skillet For Frying Chicken
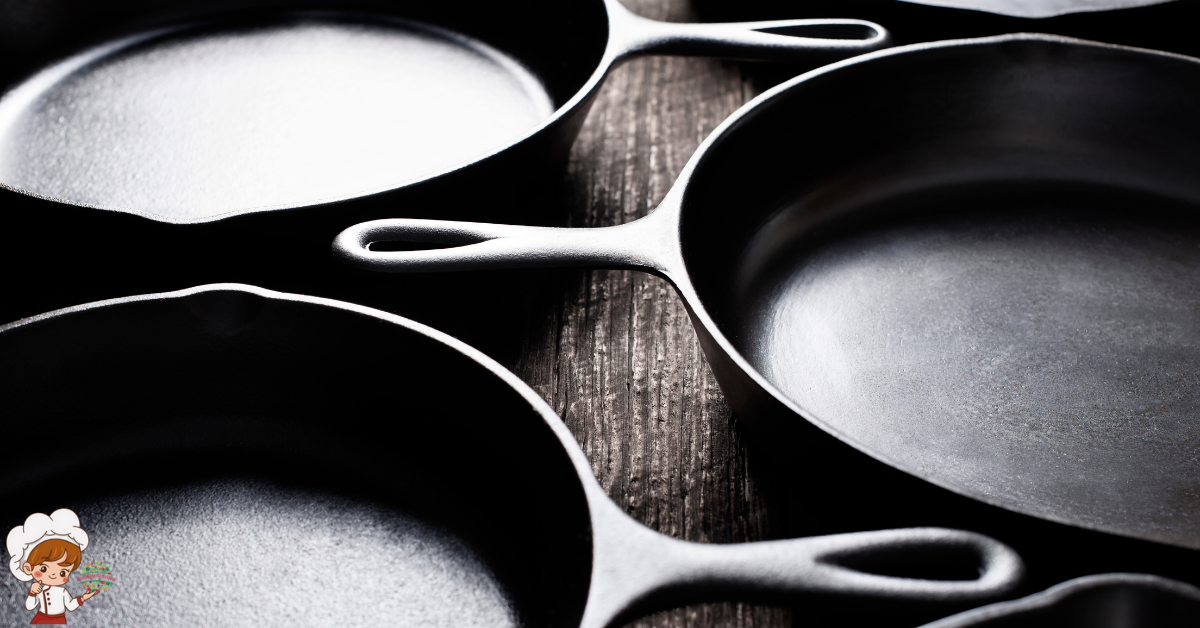
Best Cast Iron Skillet For Frying Chicken; Cast iron skillets are incredibly versatile tools that not only enhance the flavor of your fried chicken but also offer durability and excellent heat retention. When you cook with cast iron, you’re not just frying; you’re also infusing your food with trace amounts of iron, which can contribute to your daily dietary needs. This subtle boost can be especially beneficial if you’re looking to increase your iron intake for better health.
Another major advantage is their cooking versatility. Whether you’re searing, sautéing, baking, or even roasting, a cast iron skillet can handle it all. You can start your chicken on the stovetop and then shift it directly to the oven without needing to switch pans. This seamless change allows for a more efficient cooking process and helps you develop complex flavors.
Moreover, cast iron skillets retain heat exceptionally well, allowing for even cooking. This means your fried chicken gets that perfect golden crust while remaining juicy on the inside. The skillet’s ability to maintain high temperatures helps create the ideal environment for frying, reducing the chances of greasy food.
Choosing the Right Skillet
When you’re picking out a cast iron skillet, size really matters—choose one that fits your cooking needs. You’ll also want to contemplate the handle and weight, as they affect how easy it is to maneuver while cooking. Finally, think about the material and coating, since they can influence heat retention and flavor.
Skillet Size Matters
Choosing the right skillet size can make all the difference in achieving perfectly fried chicken. When you’re selecting a cast iron skillet, consider the skillet dimensions that best fit your cooking needs. A larger skillet allows for more frying capacity, which is essential if you’re cooking for a crowd or want to fry multiple pieces of chicken at once.
If your skillet is too small, the chicken may overcrowd, leading to uneven cooking and greasy results. Ideally, you want to leave enough space between each piece to guarantee the hot oil circulates properly, achieving that golden crust everyone loves.
On the other hand, if you go too large, you might end up using more oil than necessary, wasting both resources and time. A 10 to 12-inch skillet is often a sweet spot for frying chicken, accommodating a few pieces without compromising the cooking process.
Ultimately, the right skillet size not only affects how well your chicken fries but also impacts the overall flavor and texture. So, choose wisely based on your usual servings, and you’ll be on your way to frying chicken like a pro!
Handle and Weight
A skillet’s handle and weight greatly influence your frying experience, making it significant to select a model that feels comfortable and secure in your hand. When you’re frying chicken, you want a handle that provides excellent grip and control. Look for a skillet with a handle that’s ergonomically designed, which guarantees handle comfort during those longer cooking sessions. A well-designed handle will reduce strain on your wrist, allowing you to maneuver the skillet easily.
Weight distribution is equally important. A skillet that’s too heavy can be cumbersome, especially when you’re flipping chicken pieces or moving it around the kitchen. On the other hand, a lightweight skillet might not retain heat well, leading to uneven cooking. Aim for a skillet with balanced weight distribution, as this will give you better control while frying and help maintain consistent temperatures.
Ultimately, finding the right balance between handle comfort and weight will enhance your frying experience, making it more enjoyable and efficient. Don’t hesitate to test different skillets to discover what feels best in your hand. Your perfect frying companion is out there, ready to help you create that crispy, golden chicken!
Material and Coating
The material and coating of your skillet play an essential role in achieving that perfect, crispy fried chicken. When choosing the right skillet, consider the material types available. Cast iron is a popular choice due to its excellent heat retention and distribution, which helps cook your chicken evenly. If you’re looking for something lighter, aluminum skillets can heat up quickly but might not maintain temperature as well during frying.
Next, think about the coating options. Non-stick coatings can make for easier clean-up and prevent your chicken from sticking, but they may not withstand high temperatures as well as cast iron. A well-seasoned cast iron skillet develops a natural non-stick surface over time, giving you the best of both worlds: durability and easy release.
Ultimately, your choice of material and coating should align with your cooking style and preferences. If you’re committed to frying chicken regularly, investing in a high-quality cast iron skillet will pay off in flavor and texture. So, weigh your options carefully, and choose the skillet that suits your needs for that golden, crispy finish.
Preparing Your Skillet
Before you fry that chicken, you need to properly prepare your skillet. Start by seasoning it well, then move on to preheating techniques that’ll guarantee even cooking. Finally, choose the right oil to achieve that perfect crispy finish.
Seasoning Your Skillet
To guarantee your cast iron skillet is ready for frying chicken, you’ll need to properly season it to create a non-stick surface and enhance its flavor. Start by cleaning your skillet with hot water and a stiff brush to remove any rust or debris. Avoid soap, as it can strip the seasoning.
Once it’s clean, dry the skillet thoroughly to prevent rust. Apply a thin layer of oil—flaxseed, vegetable, or canola works well—using a paper towel. This is where the seasoning techniques come into play; you want an even coat without excess oil pooling.
Next, place your skillet upside down in a preheated oven at 375°F (190°C) for about an hour. This allows the oil to bond with the cast iron, creating a durable, non-stick surface. Let it cool in the oven to finish the process.
After seasoning, you’ll notice a significant flavor enhancement when frying chicken. The seasoned skillet not only prevents sticking but also adds a rich, savory taste to your dish. Regularly seasoning your skillet after each use will maintain its non-stick properties and improve its performance over time.
Preheating Techniques
When frying chicken, preheating your cast iron skillet properly is vital for achieving that perfect golden-brown crust. You’ve got a couple of effective preheating methods to choose from. The most common approach is to place your skillet on medium heat for about 5-10 minutes. This allows for even heating, which is essential for consistent cooking.
Another method involves using an infrared thermometer to check skillet temperatures. Aim for around 350°F to 375°F for frying chicken; this range guarantees the chicken cooks through while developing a crisp exterior. If you don’t have a thermometer, you can test the heat by flicking a few drops of water into the skillet; if they sizzle and evaporate quickly, your skillet is ready.
Stirring or rotating the skillet occasionally can help distribute the heat evenly. Always remember that cast iron retains heat, so once it’s hot, you might need to adjust the temperature to prevent burning. Preheating your skillet adequately sets the stage for frying chicken that’s both juicy and perfectly crispy. Prep your skillet right, and you’ll be well on your way to fried chicken perfection!
Oil Selection Tips
Choosing the right oil for frying chicken in your preheated cast iron skillet can greatly impact flavor and texture. You’ll want to select oil types that can withstand high frying temperatures without breaking down. Oils with a high smoke point, like peanut, canola, or vegetable oil, are excellent choices. These oils can handle the heat and help achieve that crispy, golden-brown crust you’re after.
When you heat your skillet, aim for a frying temperature of around 350°F to 375°F. This range guarantees even cooking while avoiding the dreaded greasy mess. If your oil starts to smoke, it means it’s too hot, so be ready to adjust the heat accordingly.
You might consider combining oils, like olive oil and a neutral oil, for added flavor without sacrificing the smoke point. Just remember not to go overboard; stick to a balanced ratio.
Seasoning Your Cast Iron
Seasoning your cast iron skillet is essential for achieving a non-stick surface and enhancing its durability. Proper seasoning creates a polymerized layer of oil that protects the skillet from rust and improves its cooking performance. To begin, choose an appropriate oil with a high smoke point, such as flaxseed, grapeseed, or vegetable oil.
Start by cleaning your skillet thoroughly, removing any rust or old seasoning. Once clean, apply a thin layer of oil to the entire surface, both inside and out. Use a paper towel to wipe off any excess oil, leaving only a light sheen. This step is vital; too much oil can lead to a sticky finish.
Next, preheat your oven to around 450°F (232°C) and place your skillet upside down on the middle rack. It’s a good idea to put a baking sheet on the rack below to catch any drips. Bake the skillet for an hour, then turn off the oven and let it cool inside. This method is one of the best seasoning techniques, ensuring an even coating.
As for seasoning frequency, it’s best to re-season your skillet whenever it starts looking dull or food begins to stick. Generally, doing this every few months is enough for regular use, but if you cook acidic foods or notice wear, you may need to do it more often. By maintaining your skillet with proper seasoning, you’ll enjoy perfectly fried chicken for years to come!
Best Chicken Cuts for Frying
After guaranteeing your cast iron skillet is well-seasoned, it’s time to contemplate the best chicken cuts for frying to achieve that perfect crispy texture. When it comes to chicken types, you have a few great options. Drumsticks and thighs are popular choices for frying because they contain more fat, which results in juicy meat and a crunchy exterior. The skin on these cuts crisps up beautifully, giving you that satisfying crunch with each bite.
If you’re looking for a leaner option, chicken breasts can work well, but they require careful frying techniques to prevent them from drying out. Consider pounding them to an even thickness and brining them briefly beforehand for best results. Wings are also fantastic for frying, especially when you want to serve them as appetizers. Their small size makes them quick to cook, and they absorb flavors exceptionally well.
Each cut has its unique advantages, and the key is in the frying technique you choose. Always start with oil at the right temperature—around 350°F is ideal for achieving that crispy finish. Make sure not to overcrowd the skillet to maintain the temperature and guarantee even cooking. Experiment with different chicken types and find your favorites. With the right cuts and techniques, your fried chicken will be a hit every time!
Marinades and Brines
To elevate the flavor and tenderness of your fried chicken, using marinades and brines is a game changer. These methods not only enhance taste but also guarantee your chicken stays juicy during frying. When it comes to marinades, you can get creative with various spice blends. Think about combining garlic powder, paprika, salt, and pepper for a simple yet effective marinade. You can also add acidity from ingredients like lemon juice or vinegar, which helps tenderize the meat.
For the best results, consider overnight brining. This process involves soaking your chicken in a salty solution, which allows the meat to absorb moisture and flavor. A basic brine can be made with water, salt, and your favorite herbs or spices. You can even experiment with sweeteners like sugar or honey to balance the saltiness. Just make certain you brine the chicken for at least 12 hours to really let those flavors soak in.
After marinating or brining, always remember to pat the chicken dry before frying. This helps achieve that perfect crispy crust you’re aiming for. Whether you opt for a simple marinade or a more complex brine, taking this extra step will greatly improve your fried chicken experience. You’ll find the chicken not only tastes better but also remains tender and juicy, making every bite a delight. So go ahead and give marinades and brines a try; your taste buds will thank you!
Breading Techniques
Once you’ve marinated or brined your chicken, mastering the art of breading is key to achieving that irresistible crunch. There are several breading methods you can use, each offering unique textures and flavors. The classic method involves three steps: a flour coating, an egg wash, and a final bread crumb layer. Start by dredging your chicken in seasoned flour, shaking off any excess. Next, dip the chicken into a beaten egg mixture to help the crumbs adhere better. Finally, coat your chicken with bread crumbs, pressing gently to guarantee a good stick.
You can play around with coating variations to elevate your chicken. For a more intense flavor, use seasoned panko breadcrumbs or crushed cornflakes for a lighter, crunchier texture. You might even mix in spices like paprika or garlic powder into your flour or crumbs for an extra kick. If you’re feeling adventurous, try using crushed nuts or even coconut flakes for a unique twist.
Don’t forget to let the breaded chicken rest for about 10 minutes before frying. This helps the coating set, reducing the risk of it falling off during cooking. Whichever breading method you choose, the goal remains the same: a golden-brown, crunchy exterior that perfectly complements the juicy chicken inside. With practice, you’ll find the perfect balance of flavor and texture that makes your fried chicken unforgettable.
The Perfect Frying Oil
Choosing the right frying oil is essential for achieving that perfect crispy texture and flavor in your fried chicken. Not all oils are created equal, and understanding the oil smoke point is imperative. The smoke point is the temperature at which oil begins to smoke and break down, which can affect both the taste and the healthiness of your dish. For frying chicken, you’ll want an oil with a high smoke point, typically around 400°F or more. Oils like canola, peanut, and sunflower are excellent choices, as they can withstand the heat without burning.
While the oil’s smoke point is important, don’t overlook flavor enhancement. Some oils, like olive oil, impart a delicious taste but have a lower smoke point, making them less suitable for frying chicken. If you want to add an extra layer of flavor, consider blending oils. For example, combining a high smoke point oil with a splash of olive oil can give your chicken a unique, savory twist without sacrificing frying performance.
Always make sure to use fresh oil, as old or reused oil can lead to off-flavors and can compromise the quality of your fried chicken. So, when you’re ready to fry, opt for oils that not only handle heat well but also complement the flavor profile you’re aiming for. With the right oil in your cast iron skillet, you’ll be well on your way to frying chicken that’s crispy, flavorful, and utterly irresistible!
Temperature Control Tips
Maintaining the right temperature while frying chicken is key to achieving that golden-brown crust and juicy interior, so it’s important to monitor your oil’s heat closely. Start by preheating your cast iron skillet on medium heat. It may take a bit longer, but this allows for even heat distribution, which is essential for consistent frying.
Use a thermometer to keep an eye on your frying temperature. Aim for around 350°F to 375°F. If the oil’s too hot, you’ll end up with burnt crusts and raw chicken inside. Too low, and the chicken will absorb more oil, resulting in a greasy mess. Adjust the heat as needed; it’s better to err on the side of caution and lower the temperature if you notice the oil smoking.
When you add the chicken to the skillet, the temperature will drop. This is normal, but watch for a quick recovery to your target frying temperature. If it doesn’t bounce back, you might need to increase the heat slightly. Keep in mind that cooking in batches can help maintain consistent temperatures. Overcrowding the pan reduces heat distribution and can lead to uneven cooking.
Lastly, always allow your chicken to rest on a rack after frying. This way, excess oil drips off, and the crust remains crispy. Mastering temperature control will elevate your frying game, ensuring perfectly cooked chicken every time.
Frying Process Step-by-Step
Start by preparing your chicken, ensuring it’s properly seasoned and coated with your choice of batter or breading for that perfect crunch. You can use a simple flour coating or a more elaborate buttermilk batter. The key is to enhance the chicken flavors while achieving that satisfying crispy texture.
Next, heat your cast iron skillet over medium-high heat. Pour in enough oil to cover the bottom of the skillet, usually about 1/2 inch deep. Use a frying thermometer to monitor the oil temperature, aiming for around 350°F. This is essential for effective frying techniques, as too low a temperature will lead to greasy chicken, while too high will burn the coating before the meat cooks through.
Once the oil is hot, carefully place your chicken pieces in the skillet, avoiding overcrowding to maintain a consistent temperature. Fry the chicken for about 10-15 minutes on each side, depending on the size of the pieces. You’ll know it’s done when the coating turns a golden brown and the internal temperature reaches 165°F.
While frying, resist the urge to flip the chicken too often—let it develop a nice crust. After you’ve achieved that beautiful color, remove the chicken and place it on a wire rack or paper towels to drain excess oil. This step helps keep the crust crispy.
Cleaning and Maintaining Skillets
After frying your chicken, proper cleaning and maintenance of your cast iron skillet will guarantee it lasts for generations and continues to deliver delicious meals. Start by letting your skillet cool down slightly, but don’t let it get cold. Rinse it with hot water and use a stiff brush or a non-abrasive sponge to scrub away any stuck-on bits. Avoid using soap, as it can strip the seasoning. If necessary, you can boil some water in the skillet to loosen stubborn residues.
Once you’ve cleaned it, dry your skillet thoroughly to prevent rust. You can place it on low heat for a few minutes to make certain all moisture evaporates. Afterward, apply a light coat of cooking oil to the inside surface. This step not only helps maintain the seasoning but also acts as a layer for rust prevention.
When it comes to skillet storage, make sure you store your cast iron skillet in a dry place. If you’re stacking it with other cookware, place a paper towel between them to absorb any moisture and prevent scratches. It’s also a good idea to check your skillet periodically for any signs of rust. If you do spot some, you can simply scrub it off and re-season the skillet.
With these simple cleaning and maintenance steps, your cast iron skillet will be ready for your next delicious frying adventure!
Frequently Asked Questions: Best Cast Iron Skillet For Frying Chicken
Can I Use a Cast Iron Skillet on an Induction Cooktop?
Yes, you can use a cast iron skillet on an induction cooktop, as long as it has induction compatibility. You’ll enjoy excellent skillet performance, achieving even heating and great results with your dishes.
How Heavy Is a Typical Cast Iron Skillet?
A typical cast iron skillet weighs between 5 to 10 pounds, depending on the skillet type. When choosing one, consider its weight for your needs, as heavier skillets can be more challenging to maneuver.
Are There Any Health Risks Associated With Cooking in Cast Iron?
When cooking in cast iron, iron leaching can occur, but it’s usually minimal and beneficial, especially for those with deficiencies. Plus, proper seasoning enhances non-stick properties, reducing health risks associated with cooking surfaces.
Can I Store Food in a Cast Iron Skillet?
You shouldn’t store food in a cast iron skillet. It can affect the skillet seasoning and lead to rust. Instead, transfer leftovers to an airtight container for proper food storage and maintain your skillet’s quality.
What Is the Lifespan of a Well-Maintained Cast Iron Skillet?
A well-maintained cast iron skillet can last a lifetime, often over 100 years. With proper cast iron care, you guarantee its longevity, making it a cherished tool in your kitchen for generations to come.
Conclusion
Using a cast iron skillet for frying chicken elevates your culinary game with its unbeatable heat retention and flavor enhancement. By choosing the right skillet and properly seasoning it, you set the stage for delicious, crispy results. Remember to select the best chicken cuts and oil, and keep an eye on temperature for perfect frying. With a little care in cleaning and maintenance, your skillet will serve you well for years of tasty meals ahead. Enjoy your fried chicken!
A cast iron skillet is perfect for frying chicken, thanks to its excellent heat retention and ability to create a crispy, golden crust. You’ll want a skillet between 10 to 12 inches for the best results, as it prevents overcrowding. Make sure to season your skillet properly for a natural non-stick surface. Preheat it on medium heat, and maintain the oil temperature around 350°F to 375°F for perfectly cooked chicken. Remember to choose oils with high smoke points, like canola or peanut. For the best outcomes and tips, you’ll discover even more about achieving fried chicken perfection soon!
Benefits of Cast Iron Skillets
Cast iron skillets are incredibly versatile tools that not only enhance the flavor of your fried chicken but also offer durability and excellent heat retention. When you cook with cast iron, you’re not just frying; you’re also infusing your food with trace amounts of iron, which can contribute to your daily dietary needs. This subtle boost can be especially beneficial if you’re looking to increase your iron intake for better health.
Another major advantage is their cooking versatility. Whether you’re searing, sautéing, baking, or even roasting, a cast iron skillet can handle it all. You can start your chicken on the stovetop and then shift it directly to the oven without needing to switch pans. This seamless change allows for a more efficient cooking process and helps you develop complex flavors.
Moreover, cast iron skillets retain heat exceptionally well, allowing for even cooking. This means your fried chicken gets that perfect golden crust while remaining juicy on the inside. The skillet’s ability to maintain high temperatures helps create the ideal environment for frying, reducing the chances of greasy food.
Choosing the Right Skillet
When you’re picking out a cast iron skillet, size really matters—choose one that fits your cooking needs. You’ll also want to contemplate the handle and weight, as they affect how easy it is to maneuver while cooking. Finally, think about the material and coating, since they can influence heat retention and flavor.
Skillet Size Matters
Choosing the right skillet size can make all the difference in achieving perfectly fried chicken. When you’re selecting a cast iron skillet, consider the skillet dimensions that best fit your cooking needs. A larger skillet allows for more frying capacity, which is essential if you’re cooking for a crowd or want to fry multiple pieces of chicken at once.
If your skillet is too small, the chicken may overcrowd, leading to uneven cooking and greasy results. Ideally, you want to leave enough space between each piece to guarantee the hot oil circulates properly, achieving that golden crust everyone loves.
On the other hand, if you go too large, you might end up using more oil than necessary, wasting both resources and time. A 10 to 12-inch skillet is often a sweet spot for frying chicken, accommodating a few pieces without compromising the cooking process.
Ultimately, the right skillet size not only affects how well your chicken fries but also impacts the overall flavor and texture. So, choose wisely based on your usual servings, and you’ll be on your way to frying chicken like a pro!
Handle and Weight
A skillet’s handle and weight greatly influence your frying experience, making it significant to select a model that feels comfortable and secure in your hand. When you’re frying chicken, you want a handle that provides excellent grip and control. Look for a skillet with a handle that’s ergonomically designed, which guarantees handle comfort during those longer cooking sessions. A well-designed handle will reduce strain on your wrist, allowing you to maneuver the skillet easily.
Weight distribution is equally important. A skillet that’s too heavy can be cumbersome, especially when you’re flipping chicken pieces or moving it around the kitchen. On the other hand, a lightweight skillet might not retain heat well, leading to uneven cooking. Aim for a skillet with balanced weight distribution, as this will give you better control while frying and help maintain consistent temperatures.
Ultimately, finding the right balance between handle comfort and weight will enhance your frying experience, making it more enjoyable and efficient. Don’t hesitate to test different skillets to discover what feels best in your hand. Your perfect frying companion is out there, ready to help you create that crispy, golden chicken!
Material and Coating
The material and coating of your skillet play an essential role in achieving that perfect, crispy fried chicken. When choosing the right skillet, consider the material types available. Cast iron is a popular choice due to its excellent heat retention and distribution, which helps cook your chicken evenly. If you’re looking for something lighter, aluminum skillets can heat up quickly but might not maintain temperature as well during frying.
Next, think about the coating options. Non-stick coatings can make for easier clean-up and prevent your chicken from sticking, but they may not withstand high temperatures as well as cast iron. A well-seasoned cast iron skillet develops a natural non-stick surface over time, giving you the best of both worlds: durability and easy release.
Ultimately, your choice of material and coating should align with your cooking style and preferences. If you’re committed to frying chicken regularly, investing in a high-quality cast iron skillet will pay off in flavor and texture. So, weigh your options carefully, and choose the skillet that suits your needs for that golden, crispy finish.
Preparing Your Skillet
Before you fry that chicken, you need to properly prepare your skillet. Start by seasoning it well, then move on to preheating techniques that’ll guarantee even cooking. Finally, choose the right oil to achieve that perfect crispy finish.
Seasoning Your Skillet
To guarantee your cast iron skillet is ready for frying chicken, you’ll need to properly season it to create a non-stick surface and enhance its flavor. Start by cleaning your skillet with hot water and a stiff brush to remove any rust or debris. Avoid soap, as it can strip the seasoning.
Once it’s clean, dry the skillet thoroughly to prevent rust. Apply a thin layer of oil—flaxseed, vegetable, or canola works well—using a paper towel. This is where the seasoning techniques come into play; you want an even coat without excess oil pooling.
Next, place your skillet upside down in a preheated oven at 375°F (190°C) for about an hour. This allows the oil to bond with the cast iron, creating a durable, non-stick surface. Let it cool in the oven to finish the process.
After seasoning, you’ll notice a significant flavor enhancement when frying chicken. The seasoned skillet not only prevents sticking but also adds a rich, savory taste to your dish. Regularly seasoning your skillet after each use will maintain its non-stick properties and improve its performance over time.
Preheating Techniques
When frying chicken, preheating your cast iron skillet properly is vital for achieving that perfect golden-brown crust. You’ve got a couple of effective preheating methods to choose from. The most common approach is to place your skillet on medium heat for about 5-10 minutes. This allows for even heating, which is essential for consistent cooking.
Another method involves using an infrared thermometer to check skillet temperatures. Aim for around 350°F to 375°F for frying chicken; this range guarantees the chicken cooks through while developing a crisp exterior. If you don’t have a thermometer, you can test the heat by flicking a few drops of water into the skillet; if they sizzle and evaporate quickly, your skillet is ready.
Stirring or rotating the skillet occasionally can help distribute the heat evenly. Always remember that cast iron retains heat, so once it’s hot, you might need to adjust the temperature to prevent burning. Preheating your skillet adequately sets the stage for frying chicken that’s both juicy and perfectly crispy. Prep your skillet right, and you’ll be well on your way to fried chicken perfection!
Oil Selection Tips
Choosing the right oil for frying chicken in your preheated cast iron skillet can greatly impact flavor and texture. You’ll want to select oil types that can withstand high frying temperatures without breaking down. Oils with a high smoke point, like peanut, canola, or vegetable oil, are excellent choices. These oils can handle the heat and help achieve that crispy, golden-brown crust you’re after.
When you heat your skillet, aim for a frying temperature of around 350°F to 375°F. This range guarantees even cooking while avoiding the dreaded greasy mess. If your oil starts to smoke, it means it’s too hot, so be ready to adjust the heat accordingly.
You might consider combining oils, like olive oil and a neutral oil, for added flavor without sacrificing the smoke point. Just remember not to go overboard; stick to a balanced ratio.
Seasoning Your Cast Iron
Seasoning your cast iron skillet is essential for achieving a non-stick surface and enhancing its durability. Proper seasoning creates a polymerized layer of oil that protects the skillet from rust and improves its cooking performance. To begin, choose an appropriate oil with a high smoke point, such as flaxseed, grapeseed, or vegetable oil.
Start by cleaning your skillet thoroughly, removing any rust or old seasoning. Once clean, apply a thin layer of oil to the entire surface, both inside and out. Use a paper towel to wipe off any excess oil, leaving only a light sheen. This step is vital; too much oil can lead to a sticky finish.
Next, preheat your oven to around 450°F (232°C) and place your skillet upside down on the middle rack. It’s a good idea to put a baking sheet on the rack below to catch any drips. Bake the skillet for an hour, then turn off the oven and let it cool inside. This method is one of the best seasoning techniques, ensuring an even coating.
As for seasoning frequency, it’s best to re-season your skillet whenever it starts looking dull or food begins to stick. Generally, doing this every few months is enough for regular use, but if you cook acidic foods or notice wear, you may need to do it more often. By maintaining your skillet with proper seasoning, you’ll enjoy perfectly fried chicken for years to come!
Best Chicken Cuts for Frying
After guaranteeing your cast iron skillet is well-seasoned, it’s time to contemplate the best chicken cuts for frying to achieve that perfect crispy texture. When it comes to chicken types, you have a few great options. Drumsticks and thighs are popular choices for frying because they contain more fat, which results in juicy meat and a crunchy exterior. The skin on these cuts crisps up beautifully, giving you that satisfying crunch with each bite.
If you’re looking for a leaner option, chicken breasts can work well, but they require careful frying techniques to prevent them from drying out. Consider pounding them to an even thickness and brining them briefly beforehand for best results. Wings are also fantastic for frying, especially when you want to serve them as appetizers. Their small size makes them quick to cook, and they absorb flavors exceptionally well.
Each cut has its unique advantages, and the key is in the frying technique you choose. Always start with oil at the right temperature—around 350°F is ideal for achieving that crispy finish. Make sure not to overcrowd the skillet to maintain the temperature and guarantee even cooking. Experiment with different chicken types and find your favorites. With the right cuts and techniques, your fried chicken will be a hit every time!
Marinades and Brines
To elevate the flavor and tenderness of your fried chicken, using marinades and brines is a game changer. These methods not only enhance taste but also guarantee your chicken stays juicy during frying. When it comes to marinades, you can get creative with various spice blends. Think about combining garlic powder, paprika, salt, and pepper for a simple yet effective marinade. You can also add acidity from ingredients like lemon juice or vinegar, which helps tenderize the meat.
For the best results, consider overnight brining. This process involves soaking your chicken in a salty solution, which allows the meat to absorb moisture and flavor. A basic brine can be made with water, salt, and your favorite herbs or spices. You can even experiment with sweeteners like sugar or honey to balance the saltiness. Just make certain you brine the chicken for at least 12 hours to really let those flavors soak in.
After marinating or brining, always remember to pat the chicken dry before frying. This helps achieve that perfect crispy crust you’re aiming for. Whether you opt for a simple marinade or a more complex brine, taking this extra step will greatly improve your fried chicken experience. You’ll find the chicken not only tastes better but also remains tender and juicy, making every bite a delight. So go ahead and give marinades and brines a try; your taste buds will thank you!
Breading Techniques
Once you’ve marinated or brined your chicken, mastering the art of breading is key to achieving that irresistible crunch. There are several breading methods you can use, each offering unique textures and flavors. The classic method involves three steps: a flour coating, an egg wash, and a final bread crumb layer. Start by dredging your chicken in seasoned flour, shaking off any excess. Next, dip the chicken into a beaten egg mixture to help the crumbs adhere better. Finally, coat your chicken with bread crumbs, pressing gently to guarantee a good stick.
You can play around with coating variations to elevate your chicken. For a more intense flavor, use seasoned panko breadcrumbs or crushed cornflakes for a lighter, crunchier texture. You might even mix in spices like paprika or garlic powder into your flour or crumbs for an extra kick. If you’re feeling adventurous, try using crushed nuts or even coconut flakes for a unique twist.
Don’t forget to let the breaded chicken rest for about 10 minutes before frying. This helps the coating set, reducing the risk of it falling off during cooking. Whichever breading method you choose, the goal remains the same: a golden-brown, crunchy exterior that perfectly complements the juicy chicken inside. With practice, you’ll find the perfect balance of flavor and texture that makes your fried chicken unforgettable.
The Perfect Frying Oil
Choosing the right frying oil is essential for achieving that perfect crispy texture and flavor in your fried chicken. Not all oils are created equal, and understanding the oil smoke point is imperative. The smoke point is the temperature at which oil begins to smoke and break down, which can affect both the taste and the healthiness of your dish. For frying chicken, you’ll want an oil with a high smoke point, typically around 400°F or more. Oils like canola, peanut, and sunflower are excellent choices, as they can withstand the heat without burning.
While the oil’s smoke point is important, don’t overlook flavor enhancement. Some oils, like olive oil, impart a delicious taste but have a lower smoke point, making them less suitable for frying chicken. If you want to add an extra layer of flavor, consider blending oils. For example, combining a high smoke point oil with a splash of olive oil can give your chicken a unique, savory twist without sacrificing frying performance.
Always make sure to use fresh oil, as old or reused oil can lead to off-flavors and can compromise the quality of your fried chicken. So, when you’re ready to fry, opt for oils that not only handle heat well but also complement the flavor profile you’re aiming for. With the right oil in your cast iron skillet, you’ll be well on your way to frying chicken that’s crispy, flavorful, and utterly irresistible!
Temperature Control Tips
Maintaining the right temperature while frying chicken is key to achieving that golden-brown crust and juicy interior, so it’s important to monitor your oil’s heat closely. Start by preheating your cast iron skillet on medium heat. It may take a bit longer, but this allows for even heat distribution, which is essential for consistent frying.
Use a thermometer to keep an eye on your frying temperature. Aim for around 350°F to 375°F. If the oil’s too hot, you’ll end up with burnt crusts and raw chicken inside. Too low, and the chicken will absorb more oil, resulting in a greasy mess. Adjust the heat as needed; it’s better to err on the side of caution and lower the temperature if you notice the oil smoking.
When you add the chicken to the skillet, the temperature will drop. This is normal, but watch for a quick recovery to your target frying temperature. If it doesn’t bounce back, you might need to increase the heat slightly. Keep in mind that cooking in batches can help maintain consistent temperatures. Overcrowding the pan reduces heat distribution and can lead to uneven cooking.
Lastly, always allow your chicken to rest on a rack after frying. This way, excess oil drips off, and the crust remains crispy. Mastering temperature control will elevate your frying game, ensuring perfectly cooked chicken every time.
Frying Process Step-by-Step
Start by preparing your chicken, ensuring it’s properly seasoned and coated with your choice of batter or breading for that perfect crunch. You can use a simple flour coating or a more elaborate buttermilk batter. The key is to enhance the chicken flavors while achieving that satisfying crispy texture.
Next, heat your cast iron skillet over medium-high heat. Pour in enough oil to cover the bottom of the skillet, usually about 1/2 inch deep. Use a frying thermometer to monitor the oil temperature, aiming for around 350°F. This is essential for effective frying techniques, as too low a temperature will lead to greasy chicken, while too high will burn the coating before the meat cooks through.
Once the oil is hot, carefully place your chicken pieces in the skillet, avoiding overcrowding to maintain a consistent temperature. Fry the chicken for about 10-15 minutes on each side, depending on the size of the pieces. You’ll know it’s done when the coating turns a golden brown and the internal temperature reaches 165°F.
While frying, resist the urge to flip the chicken too often—let it develop a nice crust. After you’ve achieved that beautiful color, remove the chicken and place it on a wire rack or paper towels to drain excess oil. This step helps keep the crust crispy.
Cleaning and Maintaining Skillets
After frying your chicken, proper cleaning and maintenance of your cast iron skillet will guarantee it lasts for generations and continues to deliver delicious meals. Start by letting your skillet cool down slightly, but don’t let it get cold. Rinse it with hot water and use a stiff brush or a non-abrasive sponge to scrub away any stuck-on bits. Avoid using soap, as it can strip the seasoning. If necessary, you can boil some water in the skillet to loosen stubborn residues.
Once you’ve cleaned it, dry your skillet thoroughly to prevent rust. You can place it on low heat for a few minutes to make certain all moisture evaporates. Afterward, apply a light coat of cooking oil to the inside surface. This step not only helps maintain the seasoning but also acts as a layer for rust prevention.
When it comes to skillet storage, make sure you store your cast iron skillet in a dry place. If you’re stacking it with other cookware, place a paper towel between them to absorb any moisture and prevent scratches. It’s also a good idea to check your skillet periodically for any signs of rust. If you do spot some, you can simply scrub it off and re-season the skillet.
With these simple cleaning and maintenance steps, your cast iron skillet will be ready for your next delicious frying adventure!
Frequently Asked Questions: Best Cast Iron Skillet For Frying Chicken
Can I Use a Cast Iron Skillet on an Induction Cooktop?
Yes, you can use a cast iron skillet on an induction cooktop, as long as it has induction compatibility. You’ll enjoy excellent skillet performance, achieving even heating and great results with your dishes.
How Heavy Is a Typical Cast Iron Skillet?
A typical cast iron skillet weighs between 5 to 10 pounds, depending on the skillet type. When choosing one, consider its weight for your needs, as heavier skillets can be more challenging to maneuver.
Are There Any Health Risks Associated With Cooking in Cast Iron?
When cooking in cast iron, iron leaching can occur, but it’s usually minimal and beneficial, especially for those with deficiencies. Plus, proper seasoning enhances non-stick properties, reducing health risks associated with cooking surfaces.
Can I Store Food in a Cast Iron Skillet?
You shouldn’t store food in a cast iron skillet. It can affect the skillet seasoning and lead to rust. Instead, transfer leftovers to an airtight container for proper food storage and maintain your skillet’s quality.
What Is the Lifespan of a Well-Maintained Cast Iron Skillet?
A well-maintained cast iron skillet can last a lifetime, often over 100 years. With proper cast iron care, you guarantee its longevity, making it a cherished tool in your kitchen for generations to come.

Conclusion
Using a cast iron skillet for frying chicken elevates your culinary game with its unbeatable heat retention and flavor enhancement. By choosing the right skillet and properly seasoning it, you set the stage for delicious, crispy results. Remember to select the best chicken cuts and oil, and keep an eye on temperature for perfect frying. With a little care in cleaning and maintenance, your skillet will serve you well for years of tasty meals ahead. Enjoy your fried chicken!