Great Middle Eastern Bread Recipes From Scratch
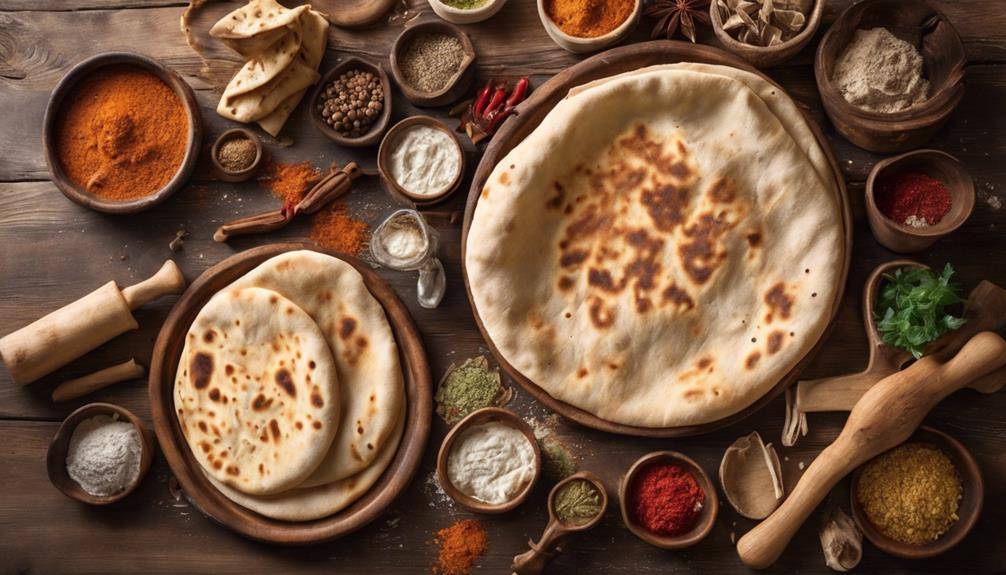
You can easily create authentic Middle Eastern Bread Recipes From Scratch, bringing tradition and flavor into your kitchen. Start with staples like pita, lavash, or khubz, each requiring just a few basic ingredients: flour, yeast, salt, and water. Activate your yeast with warm water, mix your ingredients, and knead until smooth. Allow your dough to rise, then shape it into rounds or flatbreads. Bake at high temperatures for that perfect crust. You can elevate flavors using herbs, spices, and even yogurt. Keep going, and you’ll uncover tips and techniques that will enhance your baking experience!
Understanding Middle Eastern Breads
When you immerse yourself in the world of Middle Eastern breads, you’ll discover a rich tapestry of flavors and textures that reflect the region’s diverse cultures. Each type of bread carries its own cultural significance, often serving as a staple in daily meals and special occasions alike. For instance, pita bread is ubiquitous across many countries, acting as both a vessel for dips like hummus and a companion to grilled meats. You’ll find that these breads not only nourish but also connect people, often being shared among family and friends.
As you explore regional variations, you’ll notice how local ingredients and traditions shape each bread’s unique character. In Lebanon, you might encounter the thin, airy lavash, while in Egypt, the dense and chewy aish baladi reigns supreme. Each region has its own methods of preparation, reflecting the agricultural practices and culinary histories of the area. Even within a single country, the bread can vary considerably from one city to another.
Understanding these nuances enhances your appreciation for Middle Eastern breads. It’s not just about the taste; it’s about the stories they tell and the communities they represent. You’ll find that the process of making bread often involves generations of knowledge passed down, indicating a deep connection to cultural identity. As you explore these recipes, remember that you’re not just cooking; you’re participating in a long-standing tradition that celebrates the rich diversity of the Middle East.
Essential Ingredients Overview
When making Middle Eastern bread, you’ll want to focus on the key flour types that give each variety its unique texture. Additionally, traditional flavor enhancements like spices and herbs can elevate your bread to new heights. Let’s explore these essential ingredients to help you create authentic recipes.
Key Flour Types
Have you ever wondered what makes Middle Eastern bread so unique? A key factor lies in the types of flour used. Whole wheat flour is popular for its rich, nutty flavor and nutritional benefits, offering more fiber and vitamins than white flour. If you’re looking for gluten-free options, explore flours derived from ancient grains like spelt, millet, or chickpeas. These options not only cater to dietary needs but also bring regional variations to your bread.
The choice of flour influences fermentation methods and dough hydration. For example, a wetter dough can create lighter, airier bread shapes, while drier dough yields denser options. Different breads may also require specific baking temperatures to achieve that perfect crust.
If you’re experimenting with yeast alternatives, consider using sourdough starter or baking powder, which can alter the texture and flavor profile of your bread. Understanding these flour types and their unique characteristics will help you craft authentic Middle Eastern bread right from scratch. So, whether you’re aiming for a rustic whole wheat loaf or a gluten-free pita, the flour you choose makes all the difference in the world of Middle Eastern baking.
Traditional Flavor Enhancements
Choosing the right flour is just the beginning of crafting delicious Middle Eastern bread. To elevate your bread, consider incorporating various herb infusions like thyme or za’atar, which add aromatic depth. Spice variations, such as cumin or coriander, can transform the flavor profile, while oil additions like olive oil enhance moisture and richness.
Yogurt enhancements not only improve the texture but also contribute a subtle tang. Nut toppings, such as sesame or sunflower seeds, provide a delightful crunch and visual appeal. Sweeteners used, like honey or date syrup, can balance savory flavors and add a hint of sweetness.
Fermentation methods vary across regions, affecting the bread’s taste and texture. For instance, long fermentation creates a sourdough-like flavor, while quick methods yield a milder taste. Don’t forget about regional differences in presentation styles; some breads are served flat, while others are shaped into loaves or rolls, each carrying cultural significance.
Tools You’ll Need
To make perfect Middle Eastern bread, you’ll need some essential baking equipment at your fingertips. Accurately measuring your ingredients is also key to achieving the right texture and flavor. Finally, setting up a clean workspace will help you focus on the art of bread making without distractions.
Essential Baking Equipment
Gathering the right baking equipment is vital for successfully creating Middle Eastern breads. Start with a large mixing bowl to combine your ingredients. A sturdy wooden spoon or dough scraper will help you mix and knead the dough effectively. You’ll also need a rolling pin for shaping your dough into the desired thickness.
Invest in a baking sheet or a stone, which provides even heat distribution—essential for achieving that perfect crust. Don’t forget a kitchen towel to cover your dough while it rises, guaranteeing a warm environment for fermentation. Additionally, a food thermometer can help you check the temperature of your baked goods, enhancing baking safety.
For ingredient storage, consider airtight containers to keep your flour, yeast, and spices fresh. This is especially important in humid climates, where moisture can ruin your ingredients. A scale is also a wise addition, as it guarantees your measurements stay precise, which is vital for bread-making success.
Measuring Ingredients Accurately
Accurate measurement of ingredients is vital for baking Middle Eastern breads, as it directly impacts the texture and flavor of the final product. To guarantee ingredient precision, you’ll need the right measuring tools. A kitchen scale is your best friend for weight versus volume measurements, especially for flour and water where slight differences can make a huge impact.
When using measuring cups, be mindful of dry versus wet ingredients; dry ingredients should be leveled off, while liquid ingredients should be measured at eye level for accuracy. Understanding ingredient ratios is essential, so keep conversion charts handy to switch between metric and imperial measurements effortlessly.
Also, consider ingredient temperature; for instance, using warm water can activate yeast better. The accuracy importance can’t be overstated—baking is a science, and even small deviations can lead to disappointing results. By mastering these techniques, you’ll set a solid foundation for your Middle Eastern bread-making journey, guaranteeing your creations are delicious and authentic.
Preparing a Clean Workspace
A clean workspace is just as important as measuring your ingredients correctly when making Middle Eastern bread. Before you plunge into the dough, take a moment to guarantee your kitchen is organized and tidy. Start by wiping down your countertop with a disinfectant to eliminate any bacteria. Clear away any clutter, so you have ample space to knead and shape your bread.
Gather the tools you’ll need: mixing bowls, measuring cups, a rolling pin, and a baking sheet. Having everything within reach enhances workspace organization, making your baking process smoother.
Next, don’t forget to wash your hands. Cleanliness is essential, as it keeps your ingredients uncontaminated and your bread safe to eat. If you’re using any utensils or tools that have been in contact with raw food, make sure to clean them thoroughly before using them for your dough.
Classic Pita Bread Recipe
Classic pita bread is a staple in Middle Eastern cuisine, known for its unique pocket that’s perfect for stuffing with flavorful fillings. This bread has a rich pita bread history, with origins dating back thousands of years, believed to have first appeared in the Fertile Crescent. As you make your own pita, you’ll connect with that ancient tradition.
To start, gather your ingredients: 2 cups of all-purpose flour, 1 teaspoon of salt, 1 teaspoon of sugar, 1 tablespoon of olive oil, and 1 packet of active dry yeast. In a bowl, mix the yeast with warm water and let it sit until frothy. Combine the flour, salt, and sugar in a separate bowl, then add the yeast mixture and olive oil. Knead the dough for about 10 minutes until it’s smooth and elastic.
Let the dough rise in a warm place for about an hour, or until it doubles in size. After that, divide the dough into balls and roll each one flat, about 1/4 inch thick. Preheat your oven to 475°F (245°C) and place a baking stone or an inverted baking sheet inside. Bake the rolled dough for 3-5 minutes until they puff up and develop a light golden color.
Once done, you can explore pita bread variations by trying different toppings or fillings, from hummus and falafel to grilled meats. Enjoy your homemade pita as a delicious accompaniment to your favorite Middle Eastern dishes!
Making Homemade Lavash
Lavash is a versatile flatbread that’s a favorite in many Middle Eastern homes. Its history dates back centuries, with roots in Armenia and surrounding regions, where it’s traditionally baked in tandoors. This ancient method gives lavash its characteristic texture and flavor, making it a staple for countless meals.
As you begin making homemade lavash, you’ll appreciate its cultural significance, not just as food but as a symbol of hospitality and community. Often, lavash is used to wrap meats, vegetables, or even to scoop up dips like hummus and baba ghanoush. You’ll find that making this bread is quite simple and rewarding.
To start, gather your ingredients: all-purpose flour, water, salt, and a little yeast. Mix these components to form a dough, then knead it until it’s smooth. Let it rest for about an hour, allowing the gluten to develop. Once your dough has risen, divide it into small balls and roll each one out into thin rounds.
Preheat your oven to a high temperature or prepare your grill for direct heat. If you have a baking stone, use it to mimic the traditional tandoor method. Bake the rolled-out dough for just a few minutes, watching for those lovely bubbles to form.
When your lavash is ready, enjoy it fresh and warm. You’ll not only savor the taste but also the rich history and cultural significance that comes with every bite.
Preparing Soft Khubz
Soft khubz embodies the warmth of Middle Eastern hospitality, making it an essential part of countless meals. With roots tracing back thousands of years, khubz has evolved into various forms across the region, each reflecting local flavors and traditions. You’ll find that preparing soft khubz is both a rewarding experience and a delightful way to connect with this rich history.
To start, gather your ingredients: all-purpose flour, water, yeast, salt, and a pinch of sugar. Mix the yeast with warm water and sugar, letting it sit until frothy. In a large bowl, combine flour and salt, then pour in the yeast mixture. Knead the dough until it’s smooth and elastic. This process can take about 10 minutes, so don’t rush it! Once kneaded, cover the dough and let it rise in a warm place until it doubles in size.
After your dough has risen, punch it down and divide it into small balls. Roll each ball out into thin circles. The thinner you roll, the softer the khubz will be! Heat a dry skillet over medium-high heat and cook each circle for about 30 seconds on each side. You’ll see those beautiful bubbles forming, a sign of perfect khubz.
When done, serve it warm to accompany your favorite dishes. Enjoy the myriad of khubz variations, from whole wheat to herb-infused, and watch how they enhance your meals.
Tasty Za’atar Bread
When you’re ready to make Tasty Za’atar Bread, the key is in the spice blend that gives it its unique flavor. You’ll want to master the dough preparation techniques to achieve the perfect texture. Plus, having some baking tips and tricks up your sleeve will guarantee your bread comes out delicious every time.
Za’atar Spice Blend
Za’atar spice blend is a flavorful cornerstone of Middle Eastern cuisine, often transforming ordinary bread into a delightful culinary experience. The za’atar origins trace back centuries, with its historical significance woven into the region’s culture. You’ll find numerous za’atar variations, each offering unique flavor profiles, thanks to the diverse herbs and spices used. By incorporating za’atar into your cooking, you’ll not only enhance taste but also enjoy its health benefits, which include anti-inflammatory and antioxidant properties.
When it comes to za’atar recipes, the possibilities are endless. Its uses extend beyond bread; you can sprinkle it on vegetables, meats, or even mix it into dips. Za’atar pairs beautifully with olive oil, creating an excellent dipping sauce to elevate your meals. If you’re interested in za’atar cultivation, consider growing your own herbs like thyme, oregano, and marjoram. For those who want to preserve this aromatic blend, store it in an airtight container to maintain its freshness. Experimenting with different za’atar blends will allow you to discover your favorite flavor combinations. Embrace the versatility of za’atar and let it enhance your bread-making journey!
Dough Preparation Techniques
To create delicious za’atar bread, mastering dough preparation techniques is vital. Start by mixing your flour, water, yeast, and salt until a shaggy dough forms. Once combined, it’s time to focus on your kneading techniques. Knead the dough on a floured surface for about 8-10 minutes until it becomes smooth and elastic. This process develops the gluten, which gives your bread its structure.
After kneading, place the dough in a greased bowl, cover it with a damp cloth, and let it rest in a warm area. Dough resting is important; it allows the yeast to work its magic, making the dough rise and enhancing its flavor. Let it rest for at least an hour, or until it doubles in size.
Once rested, punch down the dough to release any air bubbles, then shape it into your desired form. For za’atar bread, flatten the dough, brush it with olive oil, and sprinkle your za’atar spice blend generously on top. Allow it to rest again briefly before baking. Following these techniques will guarantee your za’atar bread turns out perfectly every time!
Baking Tips and Tricks
While the dough is essential, baking it properly is just as important for achieving that perfect za’atar bread. First, make certain you activate the yeast correctly. Use warm water (about 110°F) and let the yeast sit for a few minutes until it becomes frothy. This step guarantees your bread rises beautifully.
Next, pay attention to the dough fermentation. After kneading, let your dough rest in a warm, draft-free area until it doubles in size. This process enhances the flavor and texture. If you’re short on time, a quicker rise can be done in a slightly warmer environment, but don’t rush it too much!
When it’s time to bake, preheat your oven to a high temperature—around 450°F. A hot oven helps create that lovely crust. Place your dough on a baking stone or sheet lined with parchment paper to prevent sticking. You can also add steam to the oven during the first few minutes of baking by placing a pan of water inside. This keeps the crust soft while the inside cooks through, assuring your za’atar bread is perfectly fluffy and flavorful! Enjoy your baking!
Flaky Mana’eesh
Flaky Mana’eesh are a delightful Middle Eastern flatbread that combine a crisp exterior with a soft, flavorful interior. You’ll love the process of creating these flaky layers, which deliver incredible texture contrasts that make each bite satisfying. Traditional variations often include za’atar or cheese, but your topping options are endless. You can experiment with herbs, vegetables, or even meats to suit your taste.
When it comes to serving styles, you might find that these flatbreads are popular for breakfast or as a snack throughout the day. You can enjoy them warm or at room temperature, making them versatile for any occasion. Regional differences in flavors and toppings add a unique twist; for instance, some areas prefer spiced ground meat, while others stick to simple olive oil and herbs.
Dough handling is essential for achieving the perfect flaky texture. Be gentle when rolling out the dough and allow it to rest, ensuring those layers develop properly. Cooking methods vary too—some folks opt for a traditional oven, while others prefer cooking on a hot griddle for that authentic taste.
If you’re looking to make substitutions, swapping all-purpose flour for whole wheat or gluten-free options can work well, just keep in mind that it may alter the final flavor profile. With these tips, you’ll be well on your way to mastering Flaky Mana’eesh in your own kitchen!
Rustic Laffa Bread
Rustic Laffa Bread is a staple in Middle Eastern cuisine, known for its soft, chewy texture and ability to hold up against hearty fillings. This versatile flatbread has its origins in the Levant region, where it’s traditionally baked in a hot clay oven called a taboon. You’ll find that laffa variations exist across different cultures, each adding unique twists and flavors. Whether it’s stuffed with grilled meats, fresh vegetables, or fragrant herbs, laffa is the perfect vessel for your favorite fillings.
To make your own rustic laffa at home, you’ll need simple ingredients: flour, water, yeast, and salt. The process is straightforward. Start by mixing the dry ingredients and gradually adding water until you form a soft dough. Knead it until it’s smooth, then let it rise until it doubles in size. After that, divide the dough into smaller balls and roll them out into flat discs.
For the best results, preheat your oven or a skillet to a high temperature. Cook each disc for a couple of minutes on each side until it’s puffed and lightly charred. You’ll love how the exterior becomes slightly crispy while the inside remains tender and chewy.
Rustic laffa bread pairs beautifully with dips like hummus or baba ghanoush, making it a delightful addition to any meal. Once you try making this bread from scratch, you’ll appreciate its rich history and the joy it brings to your table.
Sweet and Savory Bolo
When you make Sweet and Savory Bolo, you’ll appreciate the balance of flavors that come from its unique ingredients. We’ll walk you through the step-by-step preparation to guarantee your bread turns out perfectly every time. Plus, you’ll discover some tasty serving and pairing ideas to enhance your meal.
Ingredients for Bolo Bread
To whip up delicious Bolo bread, whether sweet or savory, you’ll need a few essential ingredients that come together to create a delightful treat. First, gather your flour, as it forms the base of the dough. You’ll want all-purpose flour for a classic texture, but feel free to experiment with whole wheat for a heartier version.
Next, you’ll need sugar for sweet variations and salt for savory ones. Yeast is vital for leavening; instant yeast works well, allowing you to skip the proofing step. Add warm water or milk to activate the yeast and keep the dough moist. Don’t forget the eggs and butter, which enrich the dough and provide a tender crumb.
Bolo bread has a rich history, with roots in various cultures, leading to numerous bolo bread variations. You can add spices or fruits for a unique twist, like cinnamon for sweetness or herbs for a savory touch. Finally, topping your bread with sesame seeds or nuts can enhance both texture and flavor. With these ingredients ready, you’re all set to plunge into making your own Bolo bread!
Step-by-Step Preparation
With your ingredients for Bolo bread gathered, you’re ready to start the preparation process, whether you’re making a sweet or savory version. Begin by mixing your dry ingredients—flour, sugar, salt, and yeast—in a large bowl. If you’re making a sweet Bolo, add a dash of cinnamon or cardamom for flavor. For savory, consider herbs like thyme or rosemary.
Next, make a well in the center and gradually add warm water and oil. Stir until a dough forms. Knead the dough for about 10 minutes on a floured surface until it’s smooth and elastic. This step is essential for developing the bread’s texture, reflecting the cultural significance of Bolo in various Middle Eastern cuisines.
Now, let the dough rise in a warm place until it doubles in size, usually about an hour. This rising time can vary based on regional variations in climate and altitude, so keep an eye on it. Once it’s risen, punch it down, shape it into your desired form, and allow it to rise again for about 30 minutes. Your Bolo is almost ready to be baked, embodying the rich traditions of your culinary heritage.
Serving and Pairing Ideas
Enjoying Bolo bread opens up a world of delicious serving and pairing possibilities that enhance its flavor and texture. This bread boasts cultural significance across the Middle East, celebrated for its versatility and regional variations. You can serve it warm with a drizzle of olive oil or as a base for dips like hummus or baba ghanoush. For meal pairings, consider complementing it with savory dishes like grilled meats or spiced vegetables, which enhance the bread’s flavor profiles.
On festive occasions, Bolo bread shines alongside rich stews or as part of a mezze platter, inviting everyone to share and enjoy. You’ll appreciate its health benefits, too, as whole grain options provide fiber and nutrients. When it comes to bread storage, keep it wrapped in a cloth to maintain its freshness, or freeze it for longer-lasting enjoyment.
Experiment with different cooking methods, such as baking or grilling, to discover how they affect the texture and taste. Whether you opt for a sweet version with honey and nuts or stick to the savory side, Bolo bread promises to elevate any meal.
Flavorful Barbari Bread
Although Barbari bread is often associated with Persian cuisine, its delightful flavor and unique texture make it a favorite in many Middle Eastern households. This bread boasts a rich barbari history, originating from the streets of Iran, where it’s traditionally baked in stone ovens. The dough undergoes a meticulous fermentation process, enhancing its flavor and creating those characteristic texture differences that you’ll love.
When you prepare Barbari bread, you can experiment with various unique toppings. Often, bakers sprinkle sesame or poppy seeds on top, adding to the visual appeal and flavor profiles. These toppings not only enhance taste but also contribute nutritional value, making your bread even more satisfying.
Barbari holds significant cultural importance in Persian gatherings and meals, symbolizing hospitality and warmth. Its regional variations reflect local ingredients and baking techniques, giving each version its own flair. In some areas, you might find thicker loaves, while in others, thinner, crispier offerings prevail.
Serving traditions around Barbari bread are equally fascinating. It’s often served fresh, straight from the oven, accompanied by cheese, herbs, or dips like yogurt and garlic. As you savor each bite, you’ll appreciate how this bread transcends mere sustenance, connecting you to the vibrant culture and history of the Middle East. So, whether you’re baking it for a special occasion or a casual meal, Barbari bread is sure to impress and satisfy.
Quick and Easy Tortilla
When you need a versatile bread that can be whipped up in no time, quick and easy tortillas are the perfect solution. These simple flatbreads can serve as a base for countless meals or snacks, making them an essential addition to your cooking repertoire. With just a few ingredients—flour, water, salt, and a bit of oil—you can create a delicious tortilla that’s perfect for wraps, quesadillas, or even as a side for your favorite dishes.
The beauty of tortillas lies in their tortilla variations. You can easily switch up the flavors by incorporating whole wheat flour, cornmeal, or even spices like cumin or chili powder into the dough. Not only does this add a unique twist, but it also caters to dietary preferences. For a gluten-free option, try using almond flour or chickpea flour.
Once you’ve made your tortillas, the fun really begins with quick toppings. You can load them up with anything from fresh veggies and grilled chicken to hummus and avocado. If you’re in a hurry, even a smear of cream cheese and a sprinkle of herbs can elevate your tortilla into a satisfying snack.
Tips for Perfect Texture
Achieving the perfect texture in your tortillas comes down to a few key techniques. First, pay attention to your hydration levels. The right amount of water is essential; too little can lead to dry tortillas, while too much may make them sticky. Experiment with different flour blends to find what works best for you. Whole wheat flour can add a nutty flavor and change texture variations, so don’t hesitate to mix it up.
Kneading techniques matter, too. Knead your dough until it’s smooth and elastic. This helps develop gluten, which contributes to the desired dough elasticity. After kneading, let your dough rest for an adequate period. Resting allows the gluten to relax, making it easier to shape your tortillas without tearing.
When it comes to yeast activation, make sure you’re using fresh yeast and giving it enough time to work during fermentation. Following the right fermentation times will enhance the flavor and texture of your tortillas.
Shaping methods can also affect the final product. Roll them out evenly to maintain consistency, and try to avoid overworking the dough, which can lead to toughness. Finally, keep an eye on your oven temperatures; too high can burn the tortillas, while too low won’t give them the right texture. By mastering these tips, you’ll be well on your way to making tortillas that boast the ideal texture every time!
Baking Techniques Explained
Baking bread involves a combination of science and artistry that can elevate your Middle Eastern recipes to new heights. Mastering kneading techniques is vital; you’ll want to develop gluten for a chewy texture. Knead until the dough is smooth and elastic, about 8-10 minutes, guaranteeing the right dough consistency.
Once kneaded, it’s time for proofing. This step allows the dough to rise, enhancing flavor development. Use proofing methods like placing the dough in a warm area, covered, to keep it moist. Fermentation times can vary, but typically 1-2 hours works well. You can adjust these times based on your environment and desired flavor depth.
Shaping styles are equally important. Whether you’re crafting pita, lavash, or khubz, each shape affects the final product. Make sure you shape the dough gently to retain bubbles for a light texture.
When it comes to baking temperatures, preheat your oven to around 450°F (230°C). This high heat is essential for achieving crust characteristics that are crispy on the outside while remaining soft within.
If you need to make ingredient substitutions, remember that different flours can alter your bread’s texture and taste. Experiment with whole wheat or spelt for a unique twist.
Lastly, for storage tips, let the bread cool completely before wrapping it in a cloth or plastic. This helps maintain moisture without making the crust soggy. With these techniques, you’re well on your way to baking delicious Middle Eastern bread.
Serving Suggestions and Pairings
Middle Eastern bread is a versatile staple that can elevate any meal. You can use it in countless ways, whether it’s a casual snack or part of an elaborate feast. Start by pairing your warm, freshly baked bread with a variety of dipping sauces. A rich tahini sauce or a vibrant baba ganoush can add layers of flavor that complement the bread beautifully.
For a more substantial dish, consider adding meat fillings. Spiced lamb or chicken shawarma tucked into pita bread creates a satisfying, handheld meal. If you’re in the mood for something lighter, load your bread with fresh vegetable toppings like tomatoes, cucumbers, and radishes, drizzled with a tangy dressing.
Cheese pairings can also enhance your experience. Soft feta or creamy labneh spread on your bread, accompanied by herb spreads like za’atar or mint, provides a delightful contrast in textures and flavors. Don’t forget about yogurt dips—they’re perfect for slathering on bread or using as a dip.
To round out your meal, serve pickled sides like turnips or cucumbers, adding a zesty crunch. For a sweet finish, fruit preserves such as fig or apricot can be spread over warm bread for a delightful treat. With these serving suggestions, you can transform your Middle Eastern bread into a centerpiece that pleases every palate.
Frequently Asked Questions: Middle Eastern Bread Recipes From Scratch
How Can I Store Leftover Middle Eastern Bread Properly?
To store leftover bread properly, use airtight bags or containers to maintain freshness. These storing techniques can greatly extend your bread’s shelf life, keeping it soft and delicious for days. Don’t forget to freeze for longer storage!
Can I Substitute Ingredients for Gluten-Free Options?
Absolutely, you can substitute ingredients for gluten-free options! Use gluten-free flours like almond or rice flour, and add binding agents such as xanthan gum or psyllium husk to achieve the right texture in your recipes.
What Are the Best Ways to Reheat Middle Eastern Bread?
To reheat your bread, try traditional techniques like wrapping it in a damp cloth and microwaving for a few seconds. Alternatively, use reheating methods such as baking briefly in the oven for a fresh taste.
How Do I Know When the Bread Is Fully Cooked?
You’ll know your bread’s fully cooked when it reaches a golden-brown crust color and sounds hollow when tapped. Confirm the baking temperature is around 375°F to achieve the perfect texture and doneness.
Can I Freeze Middle Eastern Bread for Later Use?
Yes, you can freeze bread for later use! Just use proper freezing techniques like wrapping it tightly. When you’re ready, thaw it using methods like leaving it at room temperature or heating it briefly.

Conclusion
Now that you’ve explored these delicious Middle Eastern bread recipes, you’re ready to bring a taste of the region into your kitchen! With a few essential ingredients and the right techniques, you can create warm, fluffy pita, crisp lavash, or quick tortillas. Don’t forget to experiment with serving suggestions and pairings to elevate your meals. Enjoy the process, and soon you’ll be impressing family and friends with your homemade breads! Happy baking!