A Great Beginner’s Guide To Gratinating Technique
Beginner’s Guide To Gratinating Technique; Gratinating is a fantastic technique that adds a delicious, crispy crust to your dishes. To start, choose your base, like potatoes or vegetables, and layer them in an oven-safe dish. Mix in some cream and your favorite cheese for that rich flavor. Use breadcrumbs on top for added crunch. Make sure to preheat your oven to around 375°F to 400°F, and keep an eye on the cooking time, usually between 30 to 45 minutes. For a perfect finish, broil for the last few minutes. Ready to elevate your cooking even further? There’s more to discover about this classic technique!
Understanding Gratinating
Gratinating is a cooking technique that involves browning the top of a dish with heat, often using a broiler or an oven. You might not realize it, but this method has a rich history rooted in French cuisine. The origins of gratinating can be traced back to the 18th century when chefs sought ways to enhance the flavors and textures of their dishes. They discovered that applying direct heat to the surface of a dish not only created an appealing golden crust but also intensified the overall taste.
Understanding gratinating is essential for anyone keen to elevate their cooking skills. This technique can transform ordinary meals into gourmet experiences. By applying a layer of cheese, breadcrumbs, or a combination of both, you’re not just adding flavor; you’re also creating a delightful contrast between the crispy top and the tender interior.
As you practice, pay attention to the temperature and timing. You want to achieve a perfect balance where the top is beautifully browned without overcooking the dish underneath. Remember that the key to successful gratinating lies in the even distribution of heat.
Gratinating can be applied to various dishes, from vegetables to casseroles, making it a versatile technique. By mastering the art of gratinating, you’ll add a touch of sophistication to your culinary repertoire, impressing family and friends with each beautifully browned creation. So, get ready to explore this delicious method and enhance your cooking game!
Essential Ingredients
To create a perfect gratin, you’ll want to focus on a few essential ingredients. Key dairy products like cheese and cream bring richness, while flavorful toppings add that crispy finish. Don’t forget about your starchy base choices, as they provide the heartiness that makes a gratin truly satisfying.
Key Dairy Products
When it comes to achieving the perfect gratin, the choice of dairy products is essential. You’ll want to explore various dairy varieties to find the right balance of richness and flavor. Start with cream types; heavy cream adds luxurious texture, while half-and-half can lighten the dish. For cheese selection, consider aged varieties like Gruyère or sharp cheddar for depth, or go lactose-free options if needed.
Butter choices are critical, too—unsalted butter allows you to control salt levels, enhancing your flavor profiles. If you’re looking for alternatives, milk alternatives like almond or oat milk can work, though they may alter the final texture.
Don’t overlook yogurt options; they can introduce a tangy element when mixed into your base. Sour cream is another great addition, bringing creaminess and flavor.
Remember to focus on proper dairy storage to maintain freshness. With these key dairy products, you’ll set a solid foundation for a delightful gratin that pleases everyone at the table. Whether you stick with traditional ingredients or explore alternatives, the right mix will elevate your dish beautifully.
Flavorful Toppings Options
Choosing the right dairy products sets the stage for a great gratin, but it’s the toppings that truly elevate the dish. To enhance your gratin, consider using a variety of flavorful toppings that create both texture and taste. Start with spice blends, which can add warmth and complexity. Think about using smoked paprika or Italian seasoning to give your dish a unique twist.
Herb combinations can also make a big impact. Fresh parsley, thyme, or rosemary sprinkled on top can bring brightness to the flavors. For a satisfying crunch, nut toppings like toasted breadcrumbs or crushed almonds can create delicious crusty layers that contrast beautifully with the creamy base.
Don’t shy away from sweet additions, either. A touch of caramelized onions or a sprinkle of grated cheese can provide a delightful contrast. Finally, embrace global variations by incorporating elements like curry powder for an Indian flair or chili flakes for a hint of heat. By mixing and matching these flavorful toppings, you’ll create a gratin that not only looks appealing but also bursts with flavor. So, get creative and enjoy experimenting with your combinations!
Starchy Base Choices
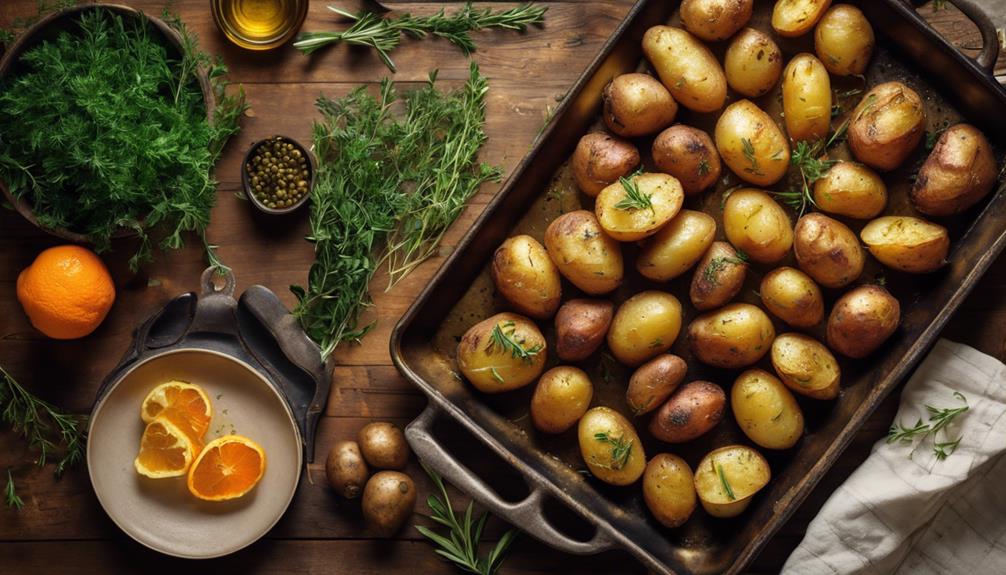
A great gratin starts with the right starchy base, and there are several essential ingredients you can choose from. Potato options, like Yukon Gold or russets, create a classic, creamy foundation. If you’re feeling adventurous, consider pasta choices such as orzo or small shells for a delightful twist. Rice varieties, including Arborio or wild rice, can also add unique textures and flavors.
For a healthier alternative, explore vegetable bases. Cauliflower base is a fantastic low-carb option that absorbs flavors beautifully. You might also try squash types, like butternut or zucchini, for a sweet, comforting touch. Sweet potato adds a hint of natural sweetness, perfect for balancing savory toppings.
Don’t forget about legume alternatives, like lentils or chickpeas, which can lend protein and heartiness to your gratin. Grain selections, such as barley or farro, bring a chewy texture that complements creamy sauces. If you’re looking for a superfood boost, quinoa mixes offer a nutty flavor and excellent nutritional benefits.
With these starchy base choices, you’re well on your way to creating a delicious gratin that’ll impress everyone at the table!
Choosing the Right Dish
When you’re choosing a dish for gratinating, consider the material first; some conduct heat better than others. The size and shape of the dish also play an important role in how evenly your dish cooks. Finally, think about heat distribution factors to guarantee your gratin comes out perfectly golden and crispy every time.
Material Considerations
The right dish can make all the difference in achieving a perfect gratin. When choosing your cooking vessel, consider the material types available. Common dish materials include ceramic, glass, cast iron, and metal. Each has unique properties that affect heat retention and cooking performance. For instance, cast iron offers excellent heat retention but requires proper maintenance to prevent rust.
If you’re looking for convenience, non-stick options can simplify cleanup, but verify they’re oven-safe materials to withstand high temperatures. Durability concerns also come into play; ceramic and glass can break easily, while metal and cast iron are sturdier.
Aesthetic choices matter too; a beautiful dish can enhance your table presentation. Just remember that some materials may have an environmental impact, so consider sustainable options when possible.
For maintenance tips, always check manufacturer guidelines for care, especially with non-stick surfaces, to prolong their lifespan and effectiveness. Ultimately, selecting the right dish not only affects your gratin’s outcome but also enhances your cooking experience. Choose wisely to enjoy both functionality and style in your kitchen!
Size and Shape
Selecting the right size and shape for your gratin dish is essential for achieving that perfect blend of texture and flavor. When choosing your dish, consider the gratin size in relation to the number of servings you plan to offer. A smaller dish may work for intimate dinners, while a larger one suits gatherings.
Shape variations can considerably influence both cooking and presentation. Oval or rectangular dishes often provide a larger cooking surface, allowing for better ingredient arrangement and even browning. On the other hand, round dishes can create a beautiful visual presentation, making them ideal for showcasing layered ingredients.
Dish dimensions also affect layering depth. A shallow dish promotes a crispy top layer, while a deeper one can hold more ingredients, resulting in a heartier dish. Remember, the right depth guarantees that flavors meld beautifully while still delivering that signature gratin texture.
Ultimately, your choice of size and shape shapes not just the dish’s functionality but also its appeal on the table. So, think carefully about your dish, and let that delicious gratin shine in all its glory!
Heat Distribution Factors
Choosing the right dish also involves understanding how heat distribution affects your gratin. The material and shape of your dish can greatly influence how evenly heat travels through your ingredients. For instance, a ceramic or glass dish retains heat well, creating a nice, even cooking environment. In contrast, metal dishes may heat up quickly but can lead to hot spots, causing uneven cooking.
Consider your heat sources and cooking methods when selecting your dish. If you’re using a broiler, a shallow dish is ideal, allowing the top to brown without overcooking the insides. Conversely, if you’re baking in the oven, a deeper dish may be better for thicker mixtures, as it allows for more even heat distribution throughout.
Keep in mind that the size of your dish matters, too. A crowded dish can trap moisture and prevent proper browning, while a spacious one allows for better airflow. Ultimately, by choosing the right dish based on heat distribution, you’ll guarantee that your gratin cooks evenly, giving you that perfect golden crust and tender interior every time.
Preparing Your Ingredients
How do you prepare your ingredients for a perfect gratin? Start by focusing on ingredient freshness. Fresh vegetables and herbs will elevate your dish, so choose the best quality you can find. Once you’ve gathered your ingredients, it’s time for ingredient preparation. Wash and dry everything thoroughly, as moisture can affect the final texture.
Next, pay attention to your chopping techniques. Uniformly cut your ingredients to guarantee even cooking. For example, thinly slice potatoes for a traditional potato gratin, and dice onions finely to allow their flavor to meld perfectly with the other ingredients. Remember, texture considerations matter; mix creamy elements like cheese and béchamel with crisp components like breadcrumbs to create contrast.
Flavor balancing is key in a gratin. Use a combination of herbs, spices, and aromatics to enhance your dish. A pinch of nutmeg can add warmth, while fresh thyme brightens up root vegetables. While seasonings are essential, keep an eye on your seasoning ratios. Salt and pepper should enhance, not overpower.
As you prepare, keep a tasting spoon handy. Regularly sampling helps you adjust your seasoning and guarantees you’re on track. Finally, layer your ingredients thoughtfully, but that’s a topic for later. For now, focus on getting your prep right, and you’ll set the stage for a delicious gratin that’s bursting with flavor and texture.
Techniques for Layering
Layering your ingredients correctly is vital for achieving a well-balanced gratin. The right layering techniques can elevate your dish, enhancing both its flavors and textures. Start with a solid base, like potatoes or vegetables, and consider how you want to build your gratin. Use layering methods that allow for even cooking and a beautiful presentation.
When layering ingredients, think about layering contrasts. For instance, pair creamy ingredients with crunchy toppings to create a delightful texture experience. Layering flavors is just as important; combine savory elements like garlic and herbs with sweeter components, such as caramelized onions or roasted peppers. This balance will excite your palate.
Don’t overlook layering aesthetics, as visual appeal plays a significant role in how you perceive your dish. Use vibrant, contrasting colors to make your gratin pop. This not only makes it more inviting but also hints at the variety of flavors within.
Consider layering temperatures too. You might want to start with pre-cooked ingredients, like sautéed mushrooms, to guarantee everything heats evenly. Finally, experiment with layering styles. Whether you choose a rustic, unrefined approach or a more elegant, polished presentation, remember that your layering will dictate not just how the gratin looks but also how it tastes.
With these layering techniques in your toolkit, you’re well on your way to creating a delicious and visually stunning gratin. Happy layering!
Selecting the Perfect Cheese
When it comes to selecting the perfect cheese for your gratin, you’ll want to contemplate both flavor and meltability. The right cheese can elevate your dish, adding richness and depth. Start by exploring different cheese varieties, as each brings its unique flavor profiles to the table.
For a classic gratin, consider using Gruyère, known for its nutty flavor and excellent melting qualities. It blends beautifully with other cheeses, enhancing the overall taste. If you prefer a sharper bite, aged cheddar can add a robust flavor that stands up well against creamy ingredients. Remember, a mix of cheeses often yields the best results, so don’t hesitate to experiment.
Mozzarella is another popular choice; while it’s milder, it melts beautifully, creating that gooey texture everyone loves. For something a bit more adventurous, try adding a touch of blue cheese. Its pungent flavor can provide a delightful contrast to the creaminess of your dish.
As you select your cheese, think about how it complements the other ingredients in your gratin. A balance of flavors is key; you want the cheese to enhance, not overpower. Also, consider the moisture content; cheeses that are too watery can make your gratin soggy.
The Role of Breadcrumbs
When it comes to gratin, breadcrumbs play an essential role in achieving that perfect crust. You can choose from various types, like panko or traditional, each bringing its own unique flavor and texture. Understanding how to use breadcrumbs effectively can elevate your dish to a whole new level.
Types of Breadcrumbs
Breadcrumbs play an essential role in achieving that perfect gratin texture, offering both flavor and crunch to your dish. You’ve got several options to choose from, each providing unique benefits. Panko, for instance, delivers a light, airy crunch, but if you’re looking for panko alternatives, consider crushed crackers or cornflakes for a similar texture.
If you need gluten-free options, try using ground almonds or gluten-free bread. Homemade breadcrumbs are also a great choice; simply toast your leftover bread and blend it to your desired consistency. Experiment with flavored breadcrumbs by adding herbs, spices, or even nutritional yeast for an extra kick.
Regional variations play a role too; Italian-style breadcrumbs often contain cheese and herbs, while Japanese panko is lighter and crispier. Remember, texture differences can greatly impact your dish, so choose your breadcrumbs wisely.
For storage tips, keep your breadcrumbs in an airtight container in a cool, dry place to maintain freshness. By selecting the right type of breadcrumbs, you’ll elevate your gratin to a whole new level of deliciousness!
Enhancing Flavor and Texture
A well-crafted gratin relies on more than just the main ingredients; it’s the breadcrumbs that truly enhance flavor and texture. When you sprinkle breadcrumbs on top, you’re adding a golden, crispy layer that creates a delightful texture contrast to the creamy or tender layers beneath. This contrast not only elevates the dish visually but also provides a satisfying crunch with each bite.
Choosing the right breadcrumbs is essential for effective flavor pairing. For example, if you’re making a cheesy potato gratin, consider using herbed breadcrumbs to infuse an aromatic element. On the other hand, panko breadcrumbs can add an airy crunch, making them perfect for seafood gratins.
You can also experiment by mixing in grated cheese or spices with your breadcrumbs. This can boost both flavor and texture, making that topping even more irresistible. Remember, the key is to balance the flavors in your gratin while ensuring the topping stands out. So, next time you’re crafting your dish, don’t underestimate the power of those breadcrumbs; they’re your secret weapon for achieving a perfect gratin!
Seasoning for Flavor
The secret to elevating your gratin lies in the art of seasoning. To achieve a rich and complex flavor profile, you’ll want to start with well-balanced salt. It enhances all the other ingredients and sets the stage for your dish. Experiment with herb infusions—think thyme, rosemary, or sage—to infuse your gratin with earthy notes.
Next, consider incorporating spice blends. A dash of paprika or nutmeg can add warmth, while garlic notes introduce a savory depth that complements creamy elements. For an extra kick, umami boosters like Parmesan or miso can really take your gratin to the next level.
Don’t forget about acidity levels. A sprinkle of citrus zest, like lemon or lime, can brighten the dish and cut through the richness. Just be mindful of your seasoning ratios; too much acidity can overpower the other flavors.
Aromatic oils, such as garlic-infused olive oil, can elevate your gratin’s overall essence. Drizzle it on top just before serving for a final touch of sophistication. Remember, tasting as you go is key—adjust your seasoning to find that perfect balance.
Lastly, keep in mind that the right combination of flavors will create a harmonious dish that’s a delight to the palate. By carefully selecting your seasonings, you’ll transform a simple gratin into a spectacular culinary experience. So, get creative, and let your taste buds guide you!
Oven Settings Explained
Understanding oven settings is crucial for achieving that perfect gratin texture and flavor. First, you need to set the right oven temperature, typically around 375°F to 400°F. This allows your dish to cook evenly, guaranteeing that the ingredients meld together beautifully. If you’re aiming for a crispy top, you’ll want to utilize the broil settings during the final minutes of cooking.
Pay attention to the cooking duration; generally, a gratin takes about 30 to 45 minutes. Using appropriate baking trays is important, too—metal trays conduct heat better than glass or ceramic, promoting even cooking.
Consider the heat source as well. If your oven has a convection feature, it circulates hot air, which can enhance browning and shorten cooking times. When using this feature, you might want to lower the temperature slightly to avoid over-browning.
Preheating your oven is a must; this guarantees that your gratin starts cooking immediately once it’s placed inside. The rack position also matters—placing your dish in the center of the oven allows for ideal heat distribution.
Timing Your Gratin
Getting the timing right for your gratin can make all the difference in its texture and flavor. Too little time in the oven can leave your dish undercooked, while too much can result in a dry, overdone meal. To achieve that perfect bake, you’ll want to pay close attention to timing methods as you cook.
Start by preheating your oven to the recommended temperature in your recipe. Most gratins benefit from a high heat to develop a rich, golden crust. After placing your dish in the oven, set a timer for the minimum suggested cooking time. This allows you to monitor the gratin closely without risking overcooking.
Check your gratin at the halfway point, looking for signs of doneness like bubbling edges or a slight browning on top. If you notice that it’s cooking unevenly, you might want to rotate the dish for an even bake. Remember, every oven is different, and factors like the size of your dish and the ingredients can affect cooking time.
As you approach the end of the cooking time, keep a close eye on the gratin. If it looks like it’s getting too brown, you can cover it loosely with aluminum foil to prevent burning while it finishes cooking. Ultimately, getting the timing right will enhance your gratin’s flavors and textures, ensuring it’s a dish you’ll want to make again and again.
Tips for a Crispy Top
How can you achieve that irresistible crispy top on your gratin? The secret lies in a combination of the right ingredients and techniques. Start by using a good layer of breadcrumbs or grated cheese. Both create a crispy texture that complements the creamy base of your dish. If you’re using cheese, consider mixing in a bit of grated Parmesan or Gruyère for an added depth of flavor.
Don’t skimp on the fat! A drizzle of melted butter or olive oil over your topping will not only enhance the flavor but also promote browning. This contrast between the crispy top and the rich, creamy filling creates a delightful flavor contrast that keeps everyone coming back for more.
Another tip is to broil your gratin for the last few minutes of cooking. Keep a close eye on it, as broilers can vary in intensity. This high heat guarantees that your topping gets that beautiful golden-brown color while the insides remain perfectly cooked.
Lastly, let your gratin rest for a few minutes before serving. This helps the topping firm up a bit, guaranteeing it stays crispy when you dig in. With these tips, you’ll have a gratin that not only looks amazing but also delivers that sought-after crispy texture, making every bite a delicious experience. Enjoy the satisfying crunch that contrasts beautifully with the creamy layers beneath!
Common Gratin Dishes
When it comes to common gratin dishes, you can’t go wrong with classic potato gratin and cheesy vegetable gratin. These comforting recipes highlight the beauty of the gratinating technique, offering rich flavors and a satisfying crispy top. Let’s explore how you can master these delicious dishes at home!
Classic Potato Gratin
Classic Potato Gratin is a beloved dish that brings comfort and warmth to any meal. This creamy, cheesy delight showcases the versatility of different potato varieties, such as Yukon Gold or Russet, which can enhance the texture and flavor of your gratin.
The history of gratins dates back to France, where the technique evolved to create delicious layered dishes that are baked until golden brown. When making Classic Potato Gratin, you’ll want to slice your potatoes thinly to guarantee even cooking and ideal creaminess. Layer them in a well-greased dish, alternating with garlic, herbs, and cheese. You can use Gruyère or Parmesan for a rich, savory finish.
Pour a mixture of cream and milk over the layers, then sprinkle more cheese on top for that irresistible crust. Bake until the potatoes are tender and the top is bubbly and golden. Serve it hot, letting the layers meld together for a delightful experience. Classic Potato Gratin is perfect for gatherings or cozy dinners, and mastering this dish will surely impress your family and friends. Get ready to enjoy a timeless comfort food that never goes out of style!
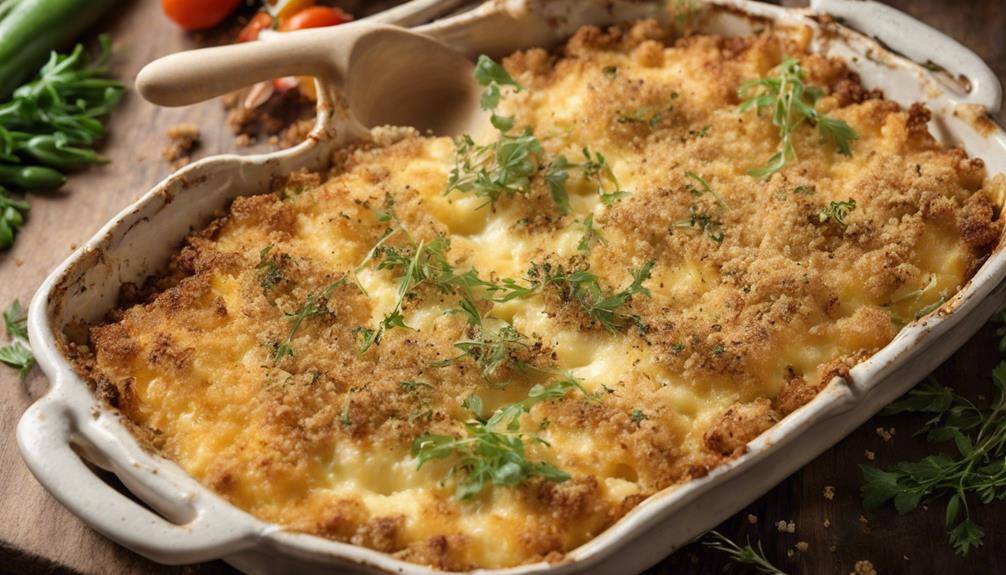
Cheesy Vegetable Gratin
Cheesy Vegetable Gratin is a delightful way to elevate your vegetable dishes, combining the rich flavors of seasonal produce with a creamy, cheesy sauce. This dish has roots in gratin history, showcasing how you can transform humble vegetables into a comforting meal. You can use a variety of vegetable combinations, such as zucchini, broccoli, and cauliflower, to create an eye-catching medley.
When it comes to cooking methods, layering your vegetables in a baking dish with a mixture of cheese, cream, and spices allows them to meld beautifully. Consider serving it alongside grilled meats or as a standalone vegetarian option. The nutritional benefits are plenty, offering fiber and vitamins while being a great way to incorporate more veggies into your diet.
If you need to cater to dietary considerations, you can substitute traditional dairy with plant-based alternatives. Play around with flavor pairings like garlic, thyme, or nutmeg to enhance the dish. For presentation tips, sprinkle fresh herbs on top before serving, making it visually appealing. With these guidelines, you’ll create a Cheesy Vegetable Gratin that’s both delicious and satisfying!
Variations on the Technique
Gratinating techniques can be adapted in various ways to suit your culinary creativity. You can start by experimenting with herb variations; fresh thyme, rosemary, or basil can elevate your dish. Spice infusions like smoked paprika or curry powder add an exciting kick, transforming the flavor profile entirely.
When it comes to protein additions, think about incorporating cooked chicken, shrimp, or even cooked lentils for a vegetarian option. Mixing vegetable combinations such as zucchini, eggplant, and bell peppers can create a colorful and nutritious base. Don’t forget sauce enhancements—try using béchamel, cheese sauce, or even a rich tomato sauce to add depth.
For gluten-free options, use almond flour or gluten-free breadcrumbs for the topping, ensuring everyone can enjoy the dish. You might also consider international twists, like using feta cheese and olives for a Mediterranean flair or adding kimchi for a spicy Korean-inspired gratin.
Utilizing seasonal ingredients keeps your dishes fresh and vibrant. In spring, asparagus and peas shine, while root vegetables are perfect for autumn. Texture contrasts are essential, too; combine creamy layers with crunchy toppings to create a satisfying bite.
Lastly, color contrasts make your gratin visually appealing. Bright green herbs or a golden-brown crust can entice anyone to dig in. With these variations, you can personalize your gratin, making it uniquely yours while still mastering the classic technique.
Storing and Reheating Gratin
When you’re ready to store leftover gratin, let it cool completely before transferring it to an airtight container. Proper gratin storage is essential to maintain its flavor and texture. Make sure to seal the container tightly to prevent moisture loss or absorption of other odors in the fridge. You can keep it in the refrigerator for up to three days. If you want to store it longer, consider freezing it. Just remember to use a freezer-safe container, leaving some space for expansion as the gratin freezes.
When it comes to reheating, there are a couple of effective reheating methods. The oven is your best bet for restoring that crispy top layer. Preheat your oven to 350°F (175°C), then cover the gratin loosely with aluminum foil to prevent it from drying out. Bake for about 20-30 minutes until it’s heated through. If you want to crisp the top, remove the foil for the last 5-10 minutes.
If you’re short on time, you can also reheat individual portions in the microwave. Just be mindful that this method might make the top less crispy. Place the gratin on a microwave-safe dish and heat it on medium power for 1-2 minutes, checking frequently to avoid overheating. Whether you choose the oven or microwave, these reheating methods will help you enjoy your delicious gratin just like the first time!
Frequently Asked Questions: Beginner’s Guide To Gratinating Technique
Can I Use Non-Dairy Alternatives for Cheese in Gratins?
Absolutely, you can use non-dairy options for cheese in gratins! Just make sure to choose varieties with good melting properties and consider flavor enhancements, like nutritional yeast or spices, to elevate your dish’s taste.
What Wine Pairs Well With a Gratin Dish?
When pairing wine with a gratin dish, consider white wine for lighter options or red wine for heartier flavors. Explore wine varietals like Chardonnay or Pinot Noir; they enhance the dish’s richness and elevate your food pairing experience.
How Do I Know When My Gratin Is Done?
You’ll know your gratin’s done when it has a golden-brown crust and a creamy, bubbling texture beneath. Keep an eye on cooking times, as they can vary depending on the ingredients and your oven.
Can I Prepare Gratin in Advance and Bake Later?
Yes, you can prepare your gratin in advance. Just follow these gratin preparation tips: assemble everything, cover it tightly, and refrigerate. When you’re ready, bake it later for delicious make-ahead options!
What Are Some Gluten-Free Breadcrumb Options for Gratins?
You’ve got great gluten-free options for breadcrumbs! Try crushed gluten-free crackers, almond flour, or ground oats as breadcrumb substitutes. They’ll add texture and flavor to your gratin while keeping it deliciously gluten-free. Enjoy experimenting!

Conclusion
Gratinating is a fun and rewarding technique that can elevate any dish. By understanding the essentials and mastering layering, you’ll create delicious meals with a crispy, golden top every time. Don’t hesitate to experiment with different ingredients and variations to make each gratin your own. With these tips in mind, you’re ready to impress your friends and family. So grab your dish and get started—your next flavor-packed gratin awaits!
If you enjoyed exploring this topic and want to dive even deeper, be sure to check out some of our other articles here on Infinite Flavors. From rich culinary histories to creative twists on classic recipes, there’s always something new to discover. Whether you’re curious about the origins of a dish, looking for fresh inspiration in the kitchen, or simply love learning about food culture, our collection of posts is the perfect next step on your flavor journey.
The Great Difference Between Gratinating And Broiling
Simple Gratinating Recipes For Dinner
Amazing Ways For Gratinating Food Without A Broiler