Step-By-Step Guide: Crafting Your Perfect Pizza Calzone
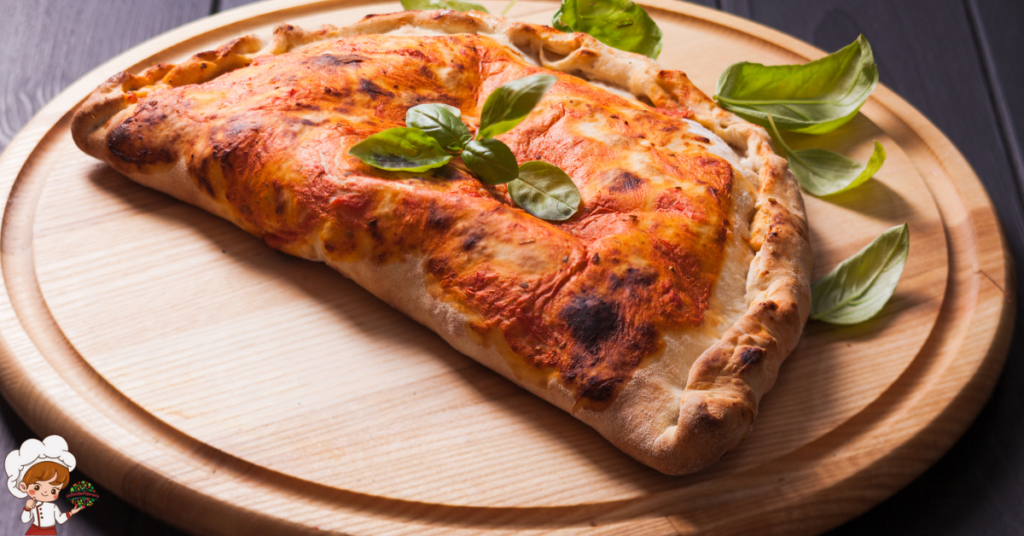
Guide: Crafting Your Perfect Pizza Calzone: To craft your perfect pizza calzone, start by choosing the right dough—opt for Neapolitan for lightness or thicker dough for density. Gather essential tools like a mixing bowl, rolling pin, and pizza cutter. Prepare your dough by mixing ingredients and letting it rise. Then, select fillings like ricotta, mozzarella, and your favorite meats or veggies. Roll out the dough, fill it, and seal the edges. Bake it in a preheated oven until golden brown. Finally, serve with marinara and enjoy! There’s a lot more to explore to elevate your calzone game and create a truly delicious meal.
Choosing the Right Dough
Click Here and Turn Every Masterpiece into a Showstopper!
When selecting dough for your perfect pizza calzone, consider how the texture and flavor will impact your overall creation. The choice of dough types plays a vital role in achieving that ideal balance of crispiness and chewiness. For instance, a classic Neapolitan dough, made with high-protein flour, offers a light and airy texture that’s perfect for folding around your favorite fillings. On the other hand, if you prefer a denser, more robust calzone, you might opt for a thicker, bread-like dough.
The fermentation process is another key factor in choosing your dough. A longer fermentation allows the dough to develop deeper flavors and a more complex texture. You can experiment with cold fermentation, where you let the dough rise slowly in the refrigerator for 24 hours or more. This method enhances the taste and makes the dough easier to work with. Alternatively, a quick rise can yield a good calzone in a pinch, but it might lack the depth of flavor you want.
Don’t forget that you can also customize your dough by adding herbs or spices to complement your fillings. Once you’ve settled on the right dough type and fermentation method, you’ll be well on your way to crafting a calzone that’s not only delicious but also uniquely yours. Take your time to perfect this fundamental step, and you’ll set a solid foundation for a mouthwatering pizza calzone experience.
Essential Tools and Equipment
To kick off your calzone-making adventure, having the right tools and equipment at your fingertips is vital. First, you’ll need a sturdy mixing bowl to combine your ingredients smoothly. Using measuring cups will help you get precise amounts of flour, water, and other components, guaranteeing your dough is spot on. A kitchen scale can also be handy, especially if you prefer weighing ingredients for accuracy.
Once your dough is ready, it’s time to roll it out. A good-quality rolling pin is vital for achieving that perfect thickness. You’ll want to use a dough scraper to help lift and shape your dough without damaging it. If you’re baking your calzones directly on a pizza stone, preheat it in your oven for that crispy crust. If you don’t have a pizza stone, a baking sheet lined with parchment paper works just as well.
When it comes time to cut your calzone, a pizza cutter will make the process quick and easy. You’ll want to make sure you’ve got a pair of oven mitts handy to protect your hands when taking your calzones out of the oven. It’s also a good idea to have extra parchment paper on hand for easy cleanup.
With these vital tools, you’re well on your way to crafting the perfect pizza calzone! Happy cooking!
Preparing the Dough
Preparing the dough is where the magic starts, transforming simple ingredients into a delicious base for your calzone. Begin by gathering your flour, water, yeast, and salt. The key to a great calzone dough lies in achieving the right dough hydration, which refers to the ratio of water to flour. Aim for about 60-65% hydration, as this will give you a nice balance of texture and elasticity.
Mix the flour and salt together in a bowl, then dissolve the yeast in warm water and combine it with the dry ingredients. Stir until a shaggy dough forms. At this point, you’ll want to knead the dough on a floured surface for about 10 minutes. This process develops gluten, giving your dough strength and chewiness.
Once you’ve kneaded it well, place the dough in a lightly oiled bowl, cover it with a damp cloth, and let it rest. This is where the fermentation process begins. Allow the dough to rise in a warm area for about 1 to 2 hours, or until it doubles in size. This fermentation not only adds flavor but also improves the dough’s texture.
After the dough has risen, gently punch it down to release the air. Now you’re ready to divide it into portions, shape it, and roll it out for your calzone. With this properly prepared dough, you’re one step closer to creating a mouthwatering meal!
Selecting Your Fillings
When it comes to selecting fillings for your calzone, you’ve got plenty of delicious options. You can stick with classic combinations, explore vegetarian delights, or even get creative with unique flavor inspirations. No matter what you choose, your calzone will reflect your personal taste!
Classic Filling Combinations
Choosing the right fillings for your calzone can make all the difference in flavor and satisfaction. To create that perfect bite, consider sticking to traditional ingredients like ricotta, mozzarella, and your favorite meats. A classic combo is pepperoni and mozzarella, delivering a familiar taste that never disappoints. If you’re feeling adventurous, try mixing in some sautéed onions and bell peppers for added depth.
Another popular variation features Italian sausage, spinach, and ricotta. This combination not only adds richness but also balances the flavors beautifully. You can’t go wrong with a mix of mushrooms and mozzarella, either—this pairing brings earthiness and creaminess together in a delightful way.
Don’t forget about the importance of seasoning! A sprinkle of oregano or a dash of red pepper flakes can elevate your filling choices. You can experiment with combinations like ham and pineapple for a sweet twist or go for a classic Margherita with fresh basil and tomatoes. Ultimately, the key is to choose fillings that complement each other and reflect your personal taste. Remember, the right mix will make your calzone a memorable meal!
Vegetarian Options Available
Vegetarian calzones offer a delicious canvas for creativity, allowing you to explore a variety of flavors without meat. Start by choosing a base of vegetarian cheese, which melts beautifully and adds a rich taste to your filling. Look for options like mozzarella or ricotta to enhance the overall flavor.
Next, think about your seasonal vegetables. Fresh ingredients not only taste better but also provide a vibrant mix of colors and textures. You might consider using spinach, mushrooms, bell peppers, or zucchini, depending on what’s in season. Sautéing these vegetables slightly before adding them to your calzone can enhance their flavors and reduce excess moisture.
Don’t forget to season your fillings! A sprinkle of salt, pepper, and Italian herbs like basil or oregano can elevate the taste. If you want a little kick, consider adding some crushed red pepper flakes.
Unique Flavor Inspirations
To create a calzone that stands out, think outside the traditional cheese and sauce combination. Instead of sticking to the basics, explore unique flavor inspirations that will excite your taste buds. Start by selecting regional cheeses that can elevate your filling. For instance, try using tangy goat cheese from the Mediterranean or creamy ricotta from Italy. These cheeses add depth and character that ordinary mozzarella just can’t match.
Next, don’t shy away from adding exotic spices to your mix. Consider incorporating za’atar for a Middle Eastern twist or garam masala for a hint of Indian flair. These spices can transform a simple filling into a vibrant explosion of flavor.
You can also play with vegetables and proteins that reflect different culinary traditions. Think of roasted red peppers, artichokes, or even spicy chorizo. Combining these elements with your chosen cheeses and spices will create a harmonious blend.
Experimentation is key, so don’t be afraid to mix and match. By incorporating regional cheeses and exotic spices, you’ll craft a calzone that’s not just delicious but also a true reflection of your culinary creativity. Enjoy the process, and let your taste buds guide you!
Assembling the Calzone
As you prepare to assemble your calzone, lay out your dough on a clean, floured surface. You’ll want to roll it out into a circle, about 10 to 12 inches in diameter. Make certain it’s even, as this will affect the overall shape and texture of your calzone. Now, let’s get to the fun part: adding your filling.
When it comes to filling distribution, less is more. Start by placing your chosen filling—like cheese, meats, or veggies—on one half of the dough. Leave about an inch of space from the edge. If you overfill, you risk a messy calzone that won’t seal properly. Use a spoon to spread the filling evenly, making sure it’s not too bunched up in one area.
For those looking for calzone assembly tips, consider adding a sprinkle of herbs or spices on top of your filling for an extra kick of flavor. This is where you can really personalize your calzone and make it your own. Once you’ve got your filling just right, it’s time to fold. Gently lift the empty half of the dough over the filled side, aligning the edges.
Before moving on to sealing the edges, take a moment to check that your filling is evenly distributed and not too crowded. This will make your calzone more enjoyable to eat and guarantee it cooks evenly. With your filling in place, you’re all set to seal it up!
Sealing the Edges
Now that you’ve assembled your calzone, it’s essential to seal the edges properly to keep all that delicious filling inside. You’ll want to use effective dough preparation techniques and choose the right edge sealing methods to guarantee a perfect finish. Let’s explore how to achieve that flawless seal!
Dough Preparation Techniques
Sealing the edges of your calzone is vital for keeping all that delicious filling inside. To achieve a perfect seal, start with well-prepared dough. Confirm your dough hydration is on point; a slightly higher hydration level can lead to a softer, more pliable dough, making it easier to shape and seal.
During the fermentation process, allow your dough to rise adequately. This step not only enhances flavor but also improves elasticity, which is important for achieving that tight seal. Once your dough is ready, divide it into portions and shape each one into a circle.
As you fill your calzone, don’t overstuff—this can make sealing difficult. Leave enough dough around the edges for a secure closure. When it’s time to seal, fold the dough over your filling and firmly press the edges together. Use your fingers or a fork to crimp the edges, guaranteeing they’re tightly sealed.
Taking these steps will help you create a calzone that’s bursting with flavor while keeping all that goodness inside. Remember, a well-sealed calzone means less mess and more satisfying bites!
Edge Sealing Methods
When it comes to creating a perfect calzone, mastering the art of sealing the edges is essential. A well-sealed calzone guarantees that your delicious fillings stay tucked inside, preventing any leaks during baking. You’ve got a couple of effective methods at your disposal: crimping styles and braiding techniques.
For crimping, you’ll want to fold the edges of the dough over your filling and pinch them together firmly. This creates a tight seal. You can use your fingers or a fork to add a decorative touch while making sure the edges are secure.
Alternatively, braiding techniques can add an attractive flair to your calzone. To braid, roll out thin strips of dough, intertwine them, and then wrap them around the edge of your calzone. This not only seals it effectively but also elevates the visual appeal.
Whichever method you choose, be certain to moisten the edges with a little water or egg wash before sealing. This helps create a better bond. With these sealing methods in your arsenal, you’ll be well on your way to crafting a calzone that’s both delicious and visually stunning!
Click Here and Turn Every Masterpiece into a Showstopper!
Prepping for Baking
Preparing for baking your pizza calzone involves a few vital steps that guarantee a delicious outcome. First, confirm your dough is at the right level of hydration. A well-hydrated dough results in a tender and chewy crust, so aim for about 60-65% hydration. This balance helps the dough rise beautifully while maintaining its structure.
Next, consider the fermentation times. Proper fermentation allows the flavors to develop and creates a lighter texture. For best results, let your dough rise for at least 1-2 hours at room temperature, or opt for a slow fermentation in the fridge for up to 24 hours. This longer process enhances the flavor profile considerably.
As you prepare, preheat your oven to the highest temperature it can reach, ideally around 475°F (245°C) or higher. If you have a pizza stone, place it in the oven during preheating. This will help create a crispy crust when you bake your calzone.
While the oven heats, gather your filling ingredients. Make sure to have everything prepped and ready to go. Choosing a balance of flavors is essential, so consider ingredients like ricotta, mozzarella, and your favorite vegetables or meats. Don’t overfill your calzone, as this can lead to messy baking.
Baking Your Calzone
Before you pop your calzone in the oven, you need to preheat it to the right temperature for ideal baking. Understanding the best baking techniques will guarantee your calzone turns out perfectly golden and delicious. Let’s explore how to achieve that perfect crust and filling.
Preheating the Oven
The anticipation of a perfectly baked calzone begins with preheating your oven to the right temperature. For ideal results, set your oven to 475°F (245°C). This high oven temperature is essential for achieving that golden, crispy crust you’re aiming for.
Once you’ve set the temperature, it’s time to focus on the preheat duration. Allow your oven to preheat for about 15 to 20 minutes. This guarantees that the heat is evenly distributed, which is crucial for cooking the calzone thoroughly. You want it hot enough to create a nice crust while properly melting the cheese and heating the filling.
To check if your oven is ready, you can use an oven thermometer for accuracy. If your oven has a built-in indicator light, wait until it signals that it’s reached the set temperature. Remember, skipping this step or not allowing enough preheat duration can lead to an undercooked calzone, ruining your hard work. So, take this time seriously—your patience will pay off in delicious, perfectly baked results! Once your oven is preheated, you’ll be ready to slide that calzone in and let the magic happen!
Baking Techniques Explained
Baking your calzone is where the magic truly happens, transforming raw ingredients into a delicious, golden masterpiece. To achieve that perfect bake, you’ll want to pay close attention to baking temperatures. Preheat your oven to a high temperature, ideally around 475°F (245°C). This high heat guarantees that your calzone cooks thoroughly and develops a crispy crust.
Dough hydration also plays a significant role in the baking process. A well-hydrated dough results in a lighter, airier calzone. If your dough is too dry, it can lead to a dense texture, while overly hydrated dough might be difficult to handle. Aim for a hydration level of about 60-65% for the best results.
Once your oven is preheated, place your calzone on a pizza stone or baking sheet lined with parchment paper. Bake for about 15-20 minutes, keeping an eye out for that beautiful golden-brown crust. If you want to enhance the browning, consider brushing the outside with olive oil before baking. When it’s done, let it cool slightly before slicing. Enjoy the fruits of your labor with every delicious bite!
Serving Suggestions
When you’re ready to serve your pizza calzone, think about pairing it with complementary sides to elevate the meal. A fresh, crisp salad is a fantastic option. The acidity of a vinaigrette can cut through the richness of the calzone, providing a balanced flavor profile. You might also consider garlic bread or cheesy breadsticks, which add a delightful crunch and extra cheesiness to your dinner.
Don’t forget about dipping sauces! Marinara is a classic choice, but you can also experiment with ranch, garlic butter, or even a spicy arrabbiata for those who like a kick. Providing a variety of dipping sauces lets everyone customize their experience, making the meal more interactive.
Serving temperatures can make a big difference, too. Aim to serve your calzones hot and fresh out of the oven. If you’re serving sides, confirm they’re at a similar temperature to keep the meal cohesive. For example, if you opt for a warm salad, toss it lightly in the oven for a few minutes to bring it to a perfect serving temperature.
You might also want to garnish your calzone with fresh herbs like basil or parsley to add a pop of color and flavor. Finally, don’t forget to provide napkins; calzones can be a bit messy, and you’ll want to be prepared for the deliciousness that awaits! Enjoy your meal and the satisfaction of sharing your creation!
Storing Leftovers
After enjoying your delicious pizza calzone, you’ll want to guarantee any leftovers are stored properly to maintain their flavor and texture. Start by letting your calzone cool to room temperature. This step is essential to prevent condensation, which can make your calzone soggy during storage.
Once cooled, wrap your calzone tightly in plastic wrap or aluminum foil. If you plan to eat the leftovers within a couple of days, you can store them in the refrigerator. Just make sure to place them in an airtight container to keep them fresh.
If you want to extend their shelf life, consider calzone freezing. You can freeze your wrapped calzones for up to three months. When you’re ready to enjoy them again, simply remove them from the freezer and thaw them in the refrigerator overnight. This method helps maintain their quality.
For reheating, there are several effective methods to choose from. You can reheat your calzone in the oven at 375°F (190°C) for about 15-20 minutes, which will restore its crispy crust. Alternatively, using an air fryer can yield excellent results, heating them thoroughly while keeping them crunchy. If you’re short on time, the microwave works too, but be aware it may make the crust a bit soft. No matter how you choose to reheat, enjoying your leftover calzone can be just as satisfying as the first bite!
Click Here and Turn Every Masterpiece into a Showstopper!
Frequently Asked Questions: Guide: Crafting Your Perfect Pizza Calzone
Can I Use Store-Bought Dough Instead of Making My Own?
Yes, you can absolutely use store-bought dough! It offers convenience and consistent dough quality, saving you time. Plus, the store-bought benefits mean you can focus on filling your calzone with delicious ingredients. Enjoy!
What Is the Ideal Thickness for Calzone Dough?
The ideal thickness for calzone dough is around a quarter-inch. This thickness balances dough hydration and fermentation, ensuring your calzone cooks evenly while maintaining a deliciously chewy texture that complements your fillings perfectly.
How Do I Prevent My Calzone From Becoming Soggy?
To prevent sogginess, use calzone baking tips like pre-baking the dough slightly, avoiding excess sauce, and ensuring fillings aren’t too wet. These steps keep your calzone crispy and delicious, enhancing your overall pizza experience.
Can I Freeze Uncooked Calzones for Later Baking?
Yes, you can freeze uncooked calzones for later baking. For best results, follow these freezing tips: wrap them tightly after dough preparation to prevent freezer burn, then bake directly from frozen when you’re ready to enjoy.
What Are Some Popular Vegetarian Filling Options?
When you’re choosing vegetarian fillings, consider spinach ricotta for a creamy texture or roasted vegetables for a hearty flavor. Both options not only taste amazing but also add vibrant colors to your calzone.

Conclusion
Now that you’ve crafted your perfect pizza calzone, it’s time to dig in and enjoy the delicious results of your hard work! Remember, the beauty of calzones lies in their versatility—feel free to experiment with different fillings and sauces. Whether you’re sharing with friends or savoring it solo, your homemade calzone is sure to impress. Don’t forget to store any leftovers properly, so you can savor that goodness again later. Happy eating!